
Easy Crochet Pullover~ The Nomad Sweater~ Free Pattern

An Easy Crochet Pullover With an oversized Fit~ The Nomad Sweater is a Free Pattern here on the blog!
Read through my inspiration and design process, scroll down for the Free Pattern or purchase the Full Color coded Printable PDF Here!

Inspiration + Design
Making a “top down” sweater or a circular yoke design has been on my “to make” list for quite sometime. There is something so enticing about making an entire crochet pullover in one piece with very few ends to weave in, because honestly, who enjoys seaming and weaving in ends? Not this girl! The only problem was that I literally had no idea where to even begin!
So I took to the internet looking for some resources on how to create a circular yoke design. The first thing I noticed was that there is not very much information on how to design a crochet pullover like this. But after a great deal of researching, I was able to find just enough information to get me started on understanding the general concept of a yoke.

What Exactly is a Yoke?!
For those of you who are wondering what the heck I’m talking about when I say the yoke of a sweater, don’t worry…… I didn’t even know what it was until a few months ago. Basically, the yoke is simply the upper part of a sweater from neck opening to underarm. So when you make a top that has a yoke design, most of the time you will be working from the neck opening down in a circular or square fashion until you get to the underarm. From there, the yoke is then separated to create space for the body and the arm holes. Then the remainder of the body is worked, and lastly the sleeves. If this seems confusing, don’t worry…. I have broken down each step in the pattern making it very beginner friendly.

The Nomad Sweater Take 1…..
Now, I would like to say that creating this crochet pullover was a walk in the park and just came together with ease. But that was definitely not the case! For my first attempt, I designed it to fit my body, which is typically how I design patterns. I tried it on round after round and made adjustments where I needed, to obtain the perfect fit. Surprisingly, it came together pretty easily and quickly. I definitely felt proud of myself when I finished it, but that excitement was short lived when I began to write up and size the pattern. Most of the time I can crunch the numbers to adjust the sizes without too much trouble, but with this crochet pullover, the numbers just wouldn’t work no matter what I did. That’s when I realized that I had actually made the whole sweater wrong and no matter what I did, it was not going to be able to translate into different sizes.
I was bummed…. to say the least.

The Nomad Sweater Take 2……
So for the second attempt at this crochet pullover, I used a much more methodical approach! Instead of just sizing my pattern to my body, I took some measurements and began to crunch the numbers before I even picked up my hook. After I got all my numbers worked out, I began crocheting. I kept my fingers crossed that math was actually on my side this time….. and it seemed like it was! From there, it was all smooth sailing, until I sent the pattern out to testers. It became apparent very early on that I had yet again messed up the math and the numbers just weren’t adding up.
All I can say is, thank goodness for great pattern testers. Otherwise this crochet pullover may have sat in the wip pile for the rest of 2021!
The Yarn
Since I made two separate attempts at this crochet pullover, I used two separate yarns.
For the first attempt, I used Lion Brand Softball, a size 5 Bulky weight yarn. I was originally drawn to this particular yarn because of its unique texture. I thought it would make for a really fun and stylish top. It comes in 14 different colors ranging from really vibrant brights to muted softer shades.

For the second attempt, I used Yarn Bee Soft and Sleek Chunky, another size 5 bulky weight yarn. Immediately, I noticed that this yarn seemed a lot more lightweight than the Softball yarn. I personally liked the lighter weight yarn for this crochet pullover because it created a better drape.
Since yarn choice is so important for projects, especially garments, I highly suggest using a size 5 bulky weight yarn that is on the lighter side. Some suggestions are:
~Mighty Stitch Bulky From Crochet.com
~Brava Bulky Yarn From crochet.com

Pattern
~Purchase the Color Coded Printable PDF Here.
~Save it to your Ravelry Here.

To Sum it up:
The Nomad sweater is a beginner friendly crochet pullover, that is made seamlessly in one piece from the top down. This type of construction allows a very customized fit for your sweater.
Yarn
~Yarn Bee Soft and Sleek Chunky or appropriate size 5 bulky weight yarn substitute.
Below is the approximate yardage for all sizes:
| Size | XS | S | M | L | XL | 2X | 3X | 4X | 5X |
| Approx Yds | 950- 1050 yds | 1050- 1100 yds | 1100- 1200 yds | 1200- 1300 yds | 1300- 1400 yds | 1400- 1500 yds | 1500- 1600 yds | 1650-1750 yds | 1700-1800 yds |
Notions
-Size M (9.0 mm) Hook
-Yarn Needle
-Stitch Markers
Gauge
Working your HDC stitches IN BETWEEN the stitches from the previous row.
9 Hdc x 9 Hdc rows= 4”
Sizing
This Crochet pullover is made to be oversized, with approximately 4”-6” of positive ease added. The measurements are Finished garment sizes, not actual bust measurements. When choosing your size, find the bust measurement that equals approximately 4” more than your actual bust measurement and make that size.
| Size | XS | S | M | L | XL | 2X | 3X | 4X | 5X |
| Bust | 34” | 38” | 42” | 46” | 50” | 54” | 58” | 62” | 66” |
| Length | 20.5” | 21” | 21.5” | 21.5” | 22” | 22” | 22” | 22.5” | 22.5” |
Abbreviations Used
Ch- Chain
Yo- Yarn Over
St- Stitch
Hdc- Half Double Crochet
Fhdc- Foundation Half Double Crochet
Hdc2tog- Half Double Crochet 2 Together
Fphdc- Front Post Half Double Crochet
Bphdc- Back Post Half Double Crochet
Pattern Notes
-This Crochet Pullover is made from top down in continuous rounds and then divided for the arms
-All stitches are worked IN BETWEEN the stitches from the previous round
-Ch Stitches do NOT count as stitches throughout.
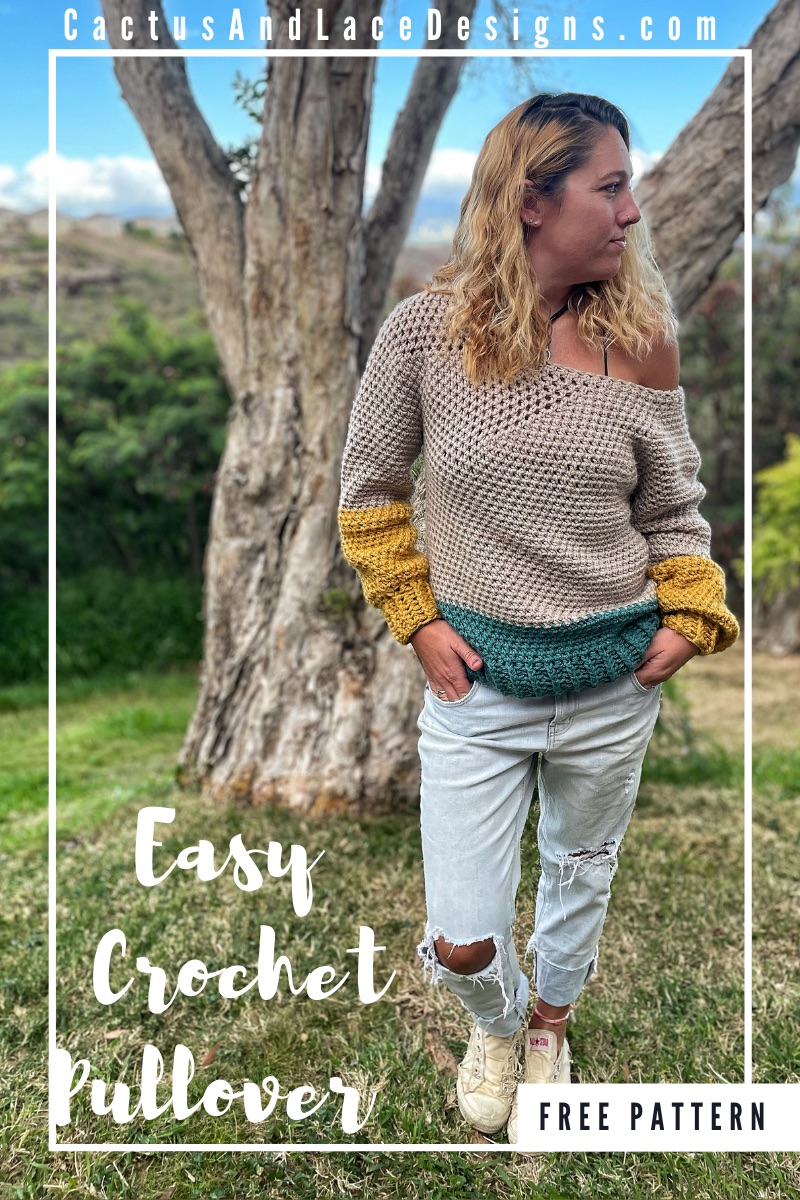
-Sweater is worked in 3 different colors.
-Color A is the main color. It is the color Linen in the example.
-Color B is the bottom section of the body. It is the color Teal in the example.
-Color C is the bottom of the sleeve. It is the color Mustard in the example.
-Total Stitches are indicated between [ ]
-The sizing guide follows size XS(S, M, L, XL, 2X, 3X, 4X, 5X). E.g. “Ch 48(56, 56, 64, 64, 64, 64, 64, 64)” means Ch 48 for XS, Ch 56 for Small, Ch 56 for Medium, Ch 64 for Large, Ch 64 for XL, Ch 64 for 2X, Ch 64 for 3X, Ch 64 for 4X, Ch 64 for 5X. If there is only one number, it applies to all sizes.
Special Stitches
Hdc in between the Hdc from previous row- All of the Half Double crochet stitches in this pattern are done in between the stitches from the previous rows instead of into the top two loops as you usually would. Make sure to go under all 3 loops and to the left of the stitch post.


Hdc2tog in between the next 2 St- Yo, insert hook in between the next 2 St, draw up a loop (3 loops on hook). Insert hook in between the next 2 St, draw up a loop (4 loops on hook). Yo, pull through all 4 loops.


Front Post Half Double Crochet– Yo, insert your hook into the space between the Hdc stitches, from front to back. Going around the Hdc post, bring hook back to the front. Yo, bring up a loop (3 loops on hook). Yo, pull through all 3 loops.


Back Post Half Double Crochet– Yo, insert your hook into the space between the Hdc stitches, from back to front. Going around the Hdc post, bring the hook back to the back. Yo, bring up a loop (3 loops on hook). Yo, pull through all 3 loops.


The Nomad Sweater

Sizes Written XS(S, M, L, XL, 2X, 3X, 4X, 5X)
Yoke
With Color A
Round 1: Fhdc 48(56, 56, 64, 64, 64, 64, 64, 64). Making sure not to twist the Ch, join with a Sl St to the first Ch to form a ring.
*If you are uncomfortable with the Fhdc, you can Ch 48(56, 56, 64, 64, 64, 64, 64, 64), join with a Sl St to the first Ch to form a ring. Ch 2, Hdc in the first Ch and each Ch around.*
Round 2: Ch 2, Hdc (in between) each St around. Do not join.
***We will be working in continuous rounds. Place a stitch marker in the first St and move it up with each round.***
Round 3: 2 Hdc (in between) the first 2 St. *Hdc (in between) the next 7 St, 2 Hdc (in between the next 2 St*. Repeat from * to * around. [54(63, 63, 72, 72, 72, 72, 72, 72)]
Round 4: 2 Hdc (in between) the first 2 St. *Hdc (in between) the next 8 St, 2 Hdc (in between the next 2 St*. Repeat from * to * around. [60(70, 70, 80, 80, 80, 80, 80, 80)]
Round 5: 2 Hdc (in between) the first 2 St. *Hdc (in between) the next 9 St, 2 Hdc (in between the next 2 St*. Repeat from * to * around. [66(77, 77, 88, 88, 88, 88, 88, 88)]
Round 6: 2 Hdc (in between) the first 2 St. *Hdc (in between) the next 10 St, 2 Hdc (in between the next 2 St*. Repeat from * to * around. [72(84, 84, 96, 96, 96, 96, 96, 96)]
Round 7: 2 Hdc (in between) the first 2 St. *Hdc (in between) the next 11 St, 2 Hdc (in between the next 2 St*. Repeat from * to * around. [78(91, 91, 104, 104, 104, 104, 104, 104)]
Round 8: 2 Hdc (in between) the first 2 St. *Hdc (in between) the next 12 St, 2 Hdc (in between the next 2 St*. Repeat from * to * around. [84(98, 98, 112, 112, 112, 112, 112, 112)]
Round 9: 2 Hdc (in between) the first 2 St. *Hdc (in between) the next 13 St, 2 Hdc (in between the next 2 St*. Repeat from * to * around. [90(105, 105, 120, 120, 120, 120, 120, 120)]
Round 10: 2 Hdc (in between) the first 2 St. *Hdc (in between) the next 14 St, 2 Hdc (in between the next 2 St*. Repeat from * to * around. [96(112, 112, 128, 128, 128, 128, 128, 128)]
Round 11: 2 Hdc (in between) the first 2 St. *Hdc (in between) the next 15 St, 2 Hdc (in between the next 2 St*. Repeat from * to * around. [102(119, 119, 136, 136, 136, 136, 136, 136)]
Round 12: 2 Hdc (in between) the first 2 St. *Hdc (in between) the next 16 St, 2 Hdc (in between the next 2 St*. Repeat from * to * around. [108(126, 126, 144, 144, 144, 144, 144, 144)]
Size S increases stop. Skip to Remainder of Yoke.
Round 13: 2 Hdc (in between) the first 2 St. *Hdc (in between) the next 17 St, 2 Hdc (in between the next 2 St*. Repeat from * to * around. [114(133, 152, 152, 152, 152, 152, 152)]
Sizes XS, M & L increases stop. Skip to Remainder of Yoke.
Round 14: 2 Hdc (in between) the first 2 St. *Hdc (in between) the next 18 St, 2 Hdc (in between the next 2 St*. Repeat from * to * around. [160(160, 160, 160, 160)]
Size XL increases stop. Skip to Remainder of Yoke.
Round 15: 2 Hdc (in between) the first 2 St. *Hdc (in between) the next 19 St, 2 Hdc (in between the next 2 St*. Repeat from * to * around. [168(168, 168, 168)]
Round 16: 2 Hdc (in between) the first 2 St. *Hdc (in between) the next 20 St, 2 Hdc (in between the next 2 St*. Repeat from * to * around. [176(176, 176, 176)]
Size 2X increases stop. Skip to Remainder of Yoke.
Round 17: 2 Hdc (in between) the first 2 St. *Hdc (in between) the next 21 St, 2 Hdc (in between the next 2 St*. Repeat from * to * around. [184(184, 184)]
Round 18: 2 Hdc (in between) the first 2 St. *Hdc (in between) the next 22 St, 2 Hdc (in between the next 2 St*. Repeat from * to * around. [192(192, 192)]
Size 3X increases stop. Skip to Remainder of Yoke.
Round 19: 2 Hdc (in between) the first 2 St. *Hdc (in between) the next 23 St, 2 Hdc (in between the next 2 St*. Repeat from * to * around. [200(200)]
Size 4X increases stop. Skip to Remainder of Yoke.
Round 20: 2 Hdc (in between) the first 2 St. *Hdc (in between) the next 24 St, 2 Hdc (in between the next 2 St*. Repeat from * to * around. [(208)]
Size 5X increases stop. Skip to Remainder of Yoke.
Remainder of Yoke
Round 14(13,14, 14, 15, 17, 19, 20, 21)-17(18, 19, 20, 21, 22, 23, 24, 25): Hdc (in between) each St around. [114(126, 133, 152, 160, 176, 192, 200, 208)]
Try on your yoke and make sure that you have enough room for your arms. You should be able to comfortably pinch together the front and back under your arm pit. If you need more length, add more rows of Hdc.
Separating body and Sleeves
Round 18(19, 20, 21, 22, 23, 24, 25, 26): Hdc (in between) the first 17(19, 20, 23, 25, 27, 29, 31, 33), Skip the next 23(25, 25, 30, 30, 34, 38, 38, 38). Hdc (in between) the next 34(38, 42, 46, 50, 54, 58, 62, 66). Skip the next 23(25, 25, 30, 29, 34, 38, 38, 38). Hdc (in between) the last 17(19, 21, 23, 25, 27, 29, 31, 33). [68(76, 83, 92, 100, 108, 116, 124, 132)]
Body
Round 19(20, 21, 22, 23, 24, 25, 26, 27): Hdc (in between) each St around. [68(76, 83, 92, 100, 108, 116, 124, 132)]
Round 20(21, 22, 23, 24, 25, 26, 27, 28)- 37(37, 37, 37, 37, 37, 37, 37, 37): Repeat round 19(20, 21, 22, 23, 24, 25, 26, 27), changing to color B at the end of round 37.
With Color B
Round 38(38, 38, 38, 38, 38, 38, 38, 38)-43(44, 45, 45, 46, 46, 46, 47, 47): Repeat round 19(20, 21, 22, 23, 24, 25, 26, 27).
***If you would like your crochet pullover to be longer or shorter, simply add or omit rounds until you reach desired length and then continue with the bottom ribbing.***
Bottom Ribbing
Sl St into the next St to join round.
We will now be working in joined rounds for the remainder of the ribbing.
Round 1: Ch 1, Fphdc in the same St as your Sl St. *Bphdc next, Fphdc next* repeat from * to * around. Sl St into the first Fphdc to join. [68(76, 83, 92, 100, 108, 116, 124, 132)]
Round 2: Ch 1, Fphdc in the first Fphdc. *Bphdc in the next Bphdc, Fphdc in the next Fphdc*. Repeat from * to * around. Sl St into th first Fphdc to join. [68(76, 83, 92, 100, 108, 116, 124, 132)]
Round 3: Repeat round 2 for as many rounds as you desire.
Finish Off
Sleeves
Round 1: Attach yarn in the armpit area and Ch 2. You will now be working around the arm hole opening. Hdc into the same space as your Ch 2, then Hdc 26(29, 29, 32, 35, 35, 38, 44, 44) evenly around. Do not join.[27(30, 30, 33, 36, 36, 39, 45, 45)]

Round 2: Hdc (in between) the first 2 St from round 1 to begin working in a spiral. Place a stitch marker in this St to mark your first St. [27(30, 30, 33, 36, 36, 39, 45, 45)]
***We will be working in continuous rounds. Place a stitch marker in the first St and move it up with each round.***
Round 3- 17: Hdc (in between) each St around. [27(30, 30, 33, 36, 36, 39, 45, 45)]
***At the end of round 17, change colors to color C. You may now finish off with color A.***
Round 18-31(32, 32, 33, 33, 34, 34, 35, 35): Hdc (in between) each St around. [27(30, 30, 33, 36, 36, 39, 45, 45)]
***If you would like your sleeves to be longer or shorter, simply add or omit rounds until you reach desired length and then continue with the next round.***
Round 32(33, 33, 34, 34, 35, 35, 36, 36): Hdc2tog (in between) the first 2 St. *Hdc (in between) the next St, Hdc2tog (in between) the next 2 St* repeat from * to * around. [18(20, 20, 22, 24, 24, 26, 30, 30)]
Round 33(34, 34, 35, 35, 36, 36, 37, 37): Hdc2tog (in between) the first 2 St. *Hdc (in between) the next 2, Hdc2tog* repeat from * to * around. [13(15, 15, 16, 18, 18, 19, 22, 22)]
*** Note: Sizes XS, L, 3X, 4X & 5X will end this round with an Hdc2tog. All other sizes will end with an Hdc.***
Bottom Cuff
Sl St into the next St to join round.
We will now be working in joined rounds for the remainder of the cuff.
Round 1: Ch 1, Fphdc in the same St as your Sl St. *Bphdc next, Fphdc next* repeat from * to * around. Sl St into the first Fphdc to join. [13(15, 15, 16, 18, 18, 19, 22, 22)]
Round 2-8: Repeat round 1
Finish Off
Neckline Trim (Optional)
Join yarn with a Sl St in the top left shoulder and Ch 1.
Sc around the Neckline. Do not join.
Continue to Sc around for as many rows as desired.


Finish Off
Tie off, tuck in those ends and enjoy your new Nomad Sweater!

Make sure to pin this pattern for later, and if you do make one tag me @Cactus.and.lace on Instagram and use the hashtag #CactusandlaceDesigns . I can’t wait to see your Nomad Sweaters, and I would love to share your pics! 🌵
Other Free Crochet Patterns You Might Love


The Harper Tee// The Haven Cardi// The Wren Tee// The Baja Hoodie