
Chunky Crochet Sweater ~ The Carli Cardigan ~ Free Pattern

A Chunky Crochet Sweater ~ The Carli Cardigan is a Free Pattern here on the blog!
Scroll down for the Free Pattern or purchase the Ad-Free, Printable PDF Here!

Inspiration + Design
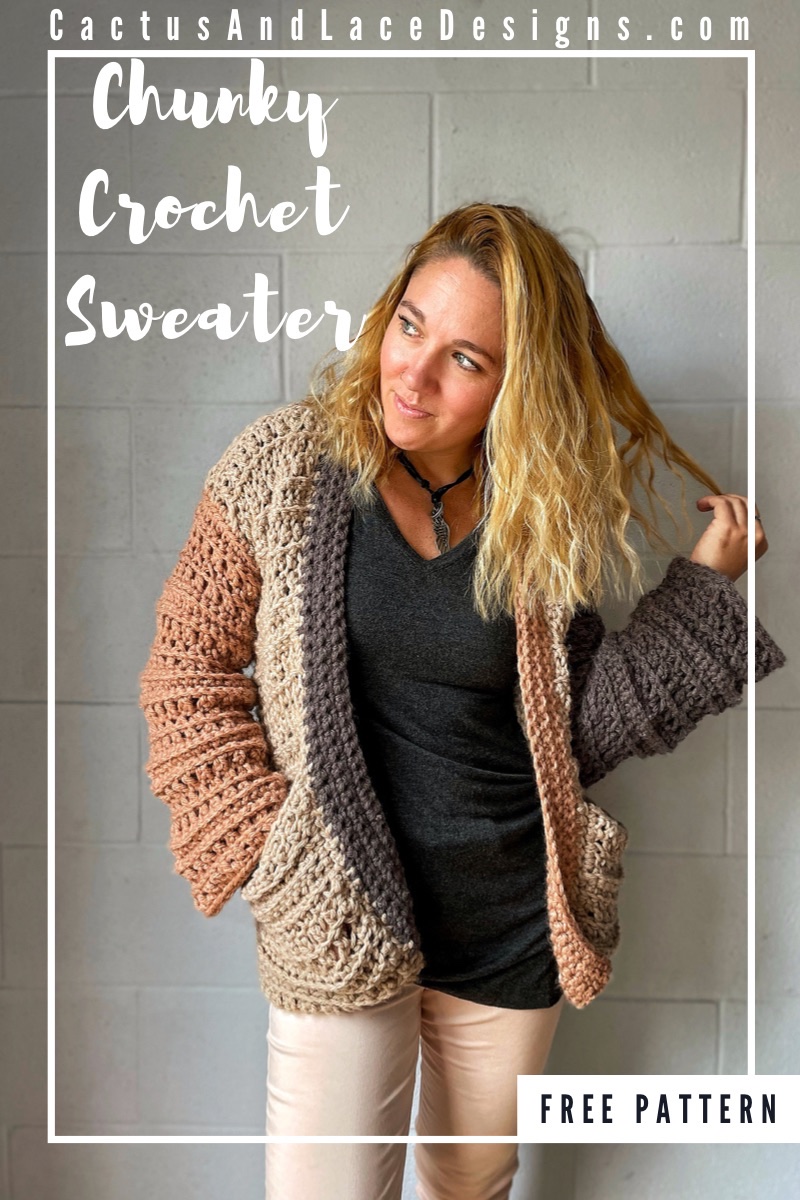
Raise your hand if you love a good Chunky Crochet Sweater!! I honestly don’t think there is anything better than a warm and cozy sweater to curl up with on those chilly days!
If you are a fan of quick, easy and warm sweaters, the Carli Cardigan is the sweater for you! It is made with bulky yarn and simple stitches, with slight variations giving it a unique stitch pattern that not only looks amazing but works up super quick!

The Yarn
Because I knew I wanted this chunky crochet sweater to be warm and quick, I decided to use a category 5 bulky weight yarn. And of course the obvious yarn choice was none other than Lion Brand Yarn Hue + Me! If you haven’t tried this yarn yet then you’re really missing out! Not only is it an acrylic/ wool blend that is durable, but it comes in 18 absolutely stunning colors!

Shop for Hue + Me here!
Pattern
~Purchase the Color Coded, Printable PDF Here.
~Save it to your Ravelry Here.

To Sum it up:
The Carli Cardigan is a chunky crochet sweater that is made in one piece, with minimal seaming. Bulky weight yarn mixed with simple stitches makes this cardigan work up super quick!
Yarn
Below is the approximate yardage for all sizes:
| Size | XS | S | M | L | XL | 2X | 3X | 4X | 5X |
| Approx Yds | 600 | 650 | 750 | 800 | 900 | 950 | 975 | 1025 | 1075 |

Notions
-Size M (9.0 mm) Hook
-Yarn Needle
-Stitch Markers
Gauge
8 St [Esc, Ch 1]= 6” and 9 pattern rows (3 Esc rows, 3 Sc rows, 3 Esc rows) = 6”
For Swatch- Ch 18 and work rows 1-9 of the pattern. Your swatch square will measure 6” wide by 6” tall.
Sizing
This Chunky Crochet Sweater is made in a classic fit, with approximately 2” of positive ease added. The measurements are Finished garment sizes, not actual bust measurements. When choosing your size, find the bust measurement that equals approximately 2” more than your actual bust measurement and make that size.
| Size | XS | S | M | L | XL | 2X | 3X | 4X | 5X |
| Bust | 32” | 36” | 40” | 44” | 48” | 52” | 56” | 60” | 64” |
| Length | 24.75” | 24.75” | 26.25” | 26.25” | 28.5” | 28.5” | 28.5” | 28.5” | 28.5” |

Abbreviations Used
Ch- Chain
Yo- Yarn Over
Ch Sp- Chain Space
Blo- Back Loops Only
Esc- Extended Single Crochet
Sc- Single Crochet
Fsc- Foundation Single Crochet
Sl St- Slip Stitch
Pattern Notes
-This Chunky Crochet Sweater is worked from the bottom up in one piece and then divided for armholes.
-ALL Stitches are worked in the Back Loop Only.
-Color A is the Main color (Desert), Color B is the right arm color (Bellini) and Color C is the Left arm color (Shadow).
-Sleeves are worked from the shoulder down to wrist in TURNED rounds.
-Ch 2 does NOT count as stitches throughout.
-Chunky Crochet Sweater is worked in a 6 row repeat. Repeat as follows 3 Esc rows in Blo, then 3 Sc rows in Blo
-Total Stitches are indicated between [ ]
-The sizing guide follows size XS(S, M, L, XL, 2X, 3X, 4X, 5X). E.g. “Ch 76(86, 96, 108, 118, 128, 140, 150, 160)” means Ch 76 for XS, Ch 86 for Small, Ch 96 for Medium, Ch 108 for Large, Ch 118 for XL, Ch 128 for 2X, Ch 140 for 3X, Ch 150 for 4X, Ch 160 for 5X. If there is only one number, it applies to all sizes.
Special Stitches
Extended Single Crochet– Insert hook into stitch, draw up a loop. Yo, pull through one loop. Yo, pull through remaining 2 loops.

The Carli Cardigan
Sizes Written XS(S, M, L, XL, 2X, 3X, 4X, 5X)
With Color A
Row 1: Ch 76 (86, 96, 108, 118, 128, 140, 150, 160). Esc in the 4th Ch from the hook, then Ch 1. *Skip the next St. Esc, Ch1 in the next* repeat from * to *in all stitches ending with an Esc in the last St. [37(42, 47, 53, 58, 63, 69, 74, 79 Esc)]
Row 2: Ch 2, Turn. Esc in the Blo of the 2nd St, (the Ch St) then Ch 1. *Skip the next St, then (Esc, Ch1) in the next*. Repeat from * to * across, ending with the last Esc in the Ch 2 turning Ch. [37(42, 47, 53, 58, 63, 69, 74, 79 Esc)]
Row 3: Repeat row 2. [37(42, 47, 53, 58, 63, 69, 74, 79 Esc)]
***Tip: All Esc St are in the Ch St from the previous row. Be sure to count your Esc stitches for proper row counts.***
Row 4: Ch 1, Turn. Sc in the Blo of the first St and each St across. [74(84, 94, 106, 116, 126, 138, 148, 158 Sc)]
Row 5-6: Repeat row 4. [74(84, 94, 106, 116, 126, 138, 148, 158 Sc)]
Row 7: Ch 2, Turn. Esc in the Blo of the 2nd St, then Ch 1. *Skip the next St, then (Esc, Ch1) in the next*. Repeat from * to * across, ending with the last Esc in the last Sc. [37(42, 47, 53, 58, 63, 69, 74, 79 Esc)]
Row 8- Row 27(27, 27, 27, 30, 30, 30, 30, 30): Repeat rows 2-7.
Sizes XS, S, M & L will end with an Esc row. Sizes XL, 2X, 3X, 4X & 5X will end with a Sc row.
Do not finish off, this is where we will divide for the armholes
If you would like your chunky crochet cardigan to be longer or shorter add or omit rows following the pattern row repeats. For example, if you would like to add length, add 3 rows of Sc followed by 3 rows of Esc before dividing for arm holes.
Panels will be divided as follows
| Size | Left Front | Back | Right Front |
| XS | 18 | 38 | 18 |
| S | 20 | 42 | 20 |
| M | 24 | 46 | 24 |
| L | 26 | 52 | 26 |
| XL | 28 | 58 | 28 |
| 2X | 32 | 62 | 32 |
| 3X | 34 | 68 | 34 |
| 4X | 36 | 74 | 36 |
| 5X | 40 | 78 | 40 |
With your sweater laying in front of you, count 18(20, 24, 26, 28, 32, 34, 36, 40) from each side towards the middle and place a stitch marker in this stitch.
Sizes XS, M, 2X, & 5X ONLY
You will now have 2 stitch markers dividing your sweater into 3 panels.
Sizes S, L, XL, 3X, & 4X ONLY
Skip the stitch right after your first stitch markers on each side and place a second set of stitch markers in the next stitch.
You will now have 4 stitch markers dividing your sweater into 3 panels. There will be one stitch in between the first front panel and the back panel left open, and one stitch in between the back panel and the second front panel left open.

With working yarns still attached, continue working in established pattern beginning with first front panel.
First Front
Sizes XS, S, M & L ONLY
Row 28: Repeat row 4, ending with the last Sc in the first St marker. [18(20, 24, 26 Sc)]
Row 29 – Row 30: Repeat row 4. [18(20, 24, 26 Sc)]
Row 31: Repeat row 7. [9(10, 12, 13 Esc)]
Row 32 – Row 39(39, 42, 42): Repeat rows 2-7.
Size XS & S will end with an Esc row and size M &L will end with a Sc row.
Finish off leaving a long tail to seam the shoulders.
Sizes XL, 2X, 3X, 4X & 5X ONLY
Row 31: Repeat row 7, ending with the last Esc in the first St marker. [14(16, 17, 18, 20 Esc)]
Row 32- Row 45: Repeat rows 2-7.
Your Sc rows will have [28(32, 34, 36, 40 Sc)]
Sizes XL, 2X, 3X, 4X, & 5X will end with an Esc row.
Finish off leaving a long tail to seam the shoulders.
Back Panel
Sizes XS, S, M & L ONLY
Join yarn in the next St Marker.
Row 28: Ch 1. Sc in the Blo of the first St and each St across, ending with the last Sc in the next St marker. [38(42, 46, 52 Sc)]
Row 29- Row 30: Repeat row 4. [38(42, 46, 52 Sc)]
Row 31: Repeat row 7. [19(21, 23, 26 Esc)]
Row 32- Row 39(39, 42, 42): Repeat rows 2-7.
Size XS & S will end with an Esc row and size M &L will end with a Sc row.
Finish off leaving a long tail to seam the shoulders.
Sizes XL, 2X, 3X, 4X & 5X ONLY
Join yarn in the next St Marker.
Row 31: Ch 2, Esc in the Blo of the 2nd St (the St immediately after the St you joined in), then Ch 1. *Skip the next St, then (Esc, Ch1) in the next*. Repeat from * to * across, ending with the last Esc in the next St marker. [29(31, 34, 37, 39 Esc)]
Row 32- Row 45: Repeat rows 2-7. [29(31, 34, 37, 39 Esc)]
Your Sc rows will have [58, 62, 68, 74, 78 Sc)]
Sizes XL, 2X, 3X, 4X, & 5X will end with an Esc row.
Finish off leaving a long tail to seam the shoulders.
Second Front
Sizes XS, S, M & L ONLY
Join yarn in the last St marker.
Row 28: Ch 1. Sc in the Blo of the first St and each St across, ending with the last Sc in the last St. [18(20, 24, 26 Sc)]
Row 29 – Row 30: Repeat row 4. [18(20, 24, 26 Sc)]
Row 31: Repeat row 7. [9(10, 12, 13 Esc)]
Row 32 – Row 39(39, 42, 42): Repeat rows 2-7.
Size XS & S will end with an Esc row and size M &L will end with a Sc row.
Finish off leaving a long tail to seam the shoulders.
Sizes XL, 2X, 3X, 4X & 5X ONLY
Join yarn in the last St marker.
Row 31: Ch 2, Esc in the Blo of the 2nd St (the St immediately after the St you joined in), then Ch 1. *Skip the next St, then (Esc, Ch1) in the next*. Repeat from * to * across, ending with the last Esc in the last St. [14(16, 17, 18, 20 Esc)]
Row 32- Row 45: Repeat rows 2-7.
Your Sc rows will have [28(32, 34, 36, 40 Sc)]
Sizes XL, 2X, 3X, 4X, & 5X will end with an Esc row.
Finish off leaving a long tail to seam the shoulders.
Seaming the shoulders
With your sweater laying in front of you, fold the left panel over the back panel and your right panel over the back panel.
It should be noted that there is no Right Side or Wrong side to this chunky crochet sweater as both sides look the same. So it does not matter which side you do the seam on.
You should line up your stitches to ensure you sew the shoulders evenly.
For example, if your front panel is 18 stitches wide, you will seam up to the 18th stitch of the back panel on both sides.
Using your yarn needle and yarn tails mattress seam the shoulder pieces to the back piece along the black line.
Sleeves
With Color B For one Sleeve & Color C for the other Sleeve
Attach yarn in the armpit area. You will now be working around the arm hole opening in TURNED rounds.
Round 1: Ch 1, Sc 36(36, 44, 44, 44, 44, 44, 44, 44) evenly around the arm hole. Join with a Sl St to the first Sc. [36(36, 44, 44, 44, 44, 44, 44, 44 Sc)]
Round 2: Ch 1, TURN. Sc in the Blo of the first St and each St around. Join with a Sl St to the first Sc. [36(36, 44, 44, 44, 44, 44, 44, 44 Sc)]
Round 3: Repeat round 2. [36(36, 44, 44, 44, 44, 44, 44, 44 Sc)]
Round 4: Ch 2, TURN. Esc in the Blo of the first St, Ch 1. *Skip the next St, (Esc, Ch1) in the Blo of the next St.* Repeat from * to * around, ending with an (Esc, Ch 1) in the Blo of the second to last St. Join with a Sl St to the top of the Ch 2. [18(18, 22, 22, 22, 22, 22, 22, 22 Esc)]
Round 5: Ch 2, TURN. Esc in the Blo of the first St (the Ch 1 St), then Ch 1. *Skip the next St, (Esc, Ch1) in the Blo of the next St.* Repeat from * to * around, ending with an (Esc, Ch 1) in the Blo of the second to last St. Join with a Sl St to the top of the Ch 2. [18(18, 22, 22, 22, 22, 22, 22, 22 Esc)]
Round 6: Repeat round 5. [18(18, 22, 22, 22, 22, 22, 22, 22 Esc)]
Round 7: Repeat round 2. [36(36, 44, 44, 44, 44, 44, 44, 44 Sc)]
Round 8-30(30, 33, 33, 33, 33, 36, 36, 36): Repeat rounds 2-7.
***If you would like a short sleeved cardigan, stop after round 15 and then move on to round 31(31, 34, 34, 34, 34, 37, 37, 37)***
Round 31(31, 34, 34, 34, 34, 37, 37, 37): Ch 1, TURN. Sc through BOTH loops of the first St and each St around. Join with a Sl St to the Sc.
Finish Off
Collar
With Color B
Turn your sweater so that the Right side front panel is facing you. Attach yarn in the bottom right corner of your sweater.

Row 1: Ch 1, Sc 49(49, 52, 52, 56, 56, 56, 56, 56) evenly along the edge of the first front panel and then switch colors to color C if you would like. Continue to Sc 49(49, 52, 52, 56, 56, 56, 56, 56) evenly down the second front. When you reach the bottom corner of the Left front panel, Ch 1 and Turn. [98(98, 104, 104, 112, 112, 112,112, 112 Sc)]
Row 2-5: Sc in each stitch across, changing colors at the half way mark. Ch 1, Turn.
Finish off
Pockets (optional)- make 2
Row 1: Fsc 16.
***If you are uncomfortable with Fsc, you can Ch 17 and Sc in the second Ch from hook and each Ch across***
Rows 2-3: Ch 1, Turn. Sc in the Blo of the first St and each St across. [16 Sc]
Row 4: Ch 2, Turn. Esc in the Blo of the 2nd St, then Ch 1. *Skip the next St, then (Esc, Ch1) in the next*. Repeat from * to * across, ending with the last Esc in the Ch 2 turning Ch. [8 Esc]
Rows 5-6: Ch 2, Turn. Esc in the Blo of the 2nd St (the Ch St), then Ch 1. *Skip the next St, then (Esc, Ch1) in the next*. Repeat from * to * across, ending with the last Esc in the Ch 2 turning Ch. [8 Esc]
Rows 7-9: Repeat row 2. [16 Sc]
Row 10: Repeat row 4. [8 Esc]
Rows 11-12: Repeat row 5. [8 Esc]
Row 13: Ch 1, Turn. Sc through BOTH loops of the first St and each St across. [16 Sc]
Do Not finish off
Ch 1, and Sc along the edges of your pockets.

Finish off leaving a long tail to attach pockets to your cardigan.
Attaching Pockets
Lay your sweater in front of you. Position the pockets where you like them. I lined the bottom of my pockets up with row 4 on both of the front panels lined up next to the collar. Take your yarn tail and mattress stitch the pocket to the sweater.

Tip: It is useful to place stitch markers in the 4 corners of your pocket attaching it to the sweater so that the pocket doesn’t move around as much while seaming.
Tie off, tuck in those ends and enjoy your new Chunky Crochet Sweater!
Make sure to pin this pattern for later, and if you do make one tag me @Cactus.and.lace on Instagram and use the hashtag #CactusandlaceDesigns . I can’t wait to see your Carli Cardigans, and I would love to share your pics! 🌵
Other Free Crochet Patterns You Might Love


The Nomad Sweater// The Haven Cardi// The Baja Hoodie// The Harper Tee
Comments are closed.
Quick Crochet Cardigan ~ The Remi Cardi~ Free Pattern~ Cactus & Lace
February 23, 2021 at 1:42 am[…] Nomad Sweater// The Carli Cardigan// The Wren Tee// The Haven […]