
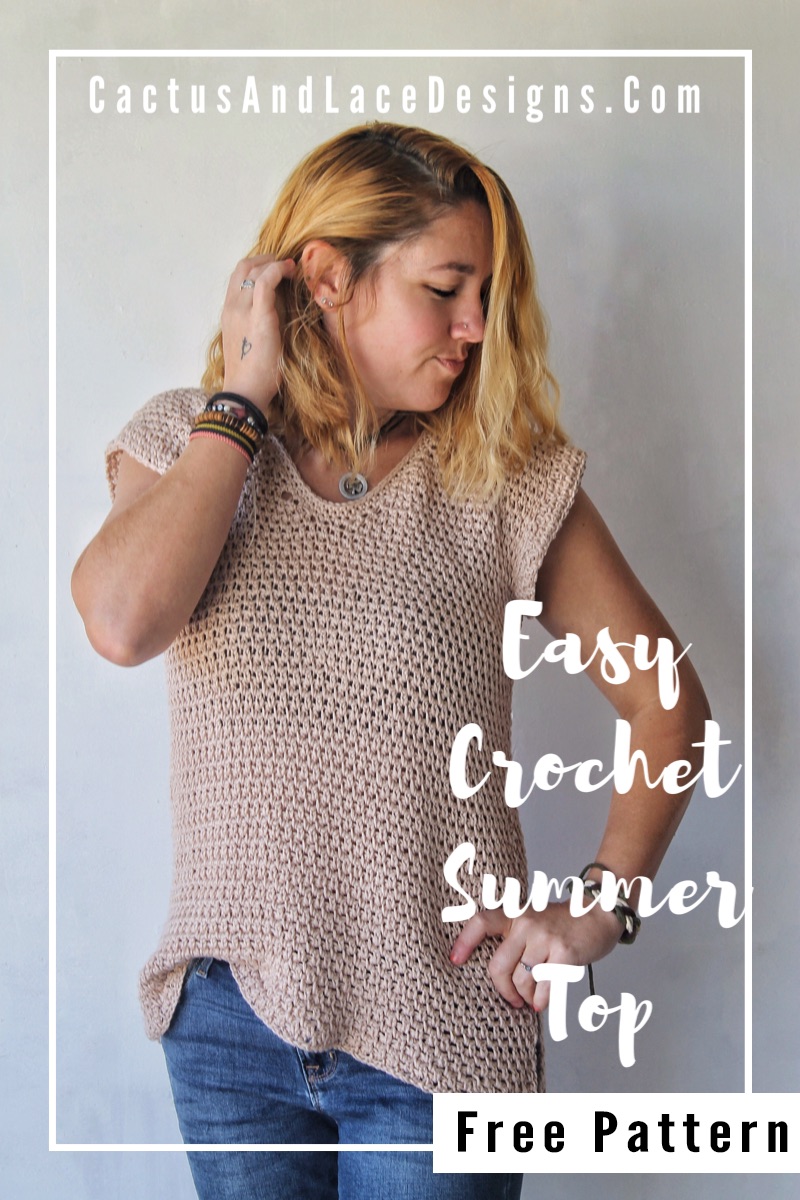
Easy Crochet Summer Top ~ The Wren Tee- Free Pattern

A quick and easy Crochet Summer Top ~ The Wren Tee is a Free Pattern Here on the blog. The Wren Top comes in a Tank and a Tee Version. Find the Free Tank version here!
Read through the my inspiration, scroll down for the Free Tee Pattern, or Purchase the Full Color Coded Printable PDF with both the Tank + Tee versions Here.

One Design, Two Separate Styles
I wanted this Crochet Summer Top to be lightweight, versatile and something that everyone would love to have in their Handmade Wardrobe!
This design is unique in that you can choose to make it one of two ways……. or you can make both!
It can be made as a tee or a tank! How great is that?!

The Yarn
For this Crochet Summer Top, I used Lion Brand’s Coboo Yarn. It is a blend of 51% Cotton and 49% Rayon from Bamboo!!!! Coboo has been a huge hit this year and I can absolutely see why! The Bamboo gives this yarn an incredibly silky and smooth texture, which results in the most beautiful drape!
And the color palate for this yarn is absolutely perfect. They are all muted and more modern shades that can be paired so easily! My favorites are Mauve, Peach, Tan, Taupe, and Olive, but there are so many beautiful shades to choose from!
Shop For Coboo Yarn Here

Pattern
~Purchase the Color Coded Printable PDF with both the Tank + Tee Versions Here
~Save it to your Ravelry Here

To sum it up:
This easy Crochet Summer Top is the perfect piece to add to your handmade wardrobe. It is very beginner friendly and uses only one stitch throughout. If you can Sc and Ch, you can make this crochet tee. And even better, it is available in sizes XS-5XL and you can even modify this design to become a Tank. Find the Wren Tank Top Free Pattern here!

Yarn
~Lion Brand Coboo Yarn or appropriate size 3 light weight yarn substitute
Below is the approximate yardage for all sizes:
| Sizes | XS | S | M | L | XL | 2XL | 3XL | 4XL | 5XL |
| Approx Yds | 650- 700 | 750- 800 | 850- 900 | 950- 1000 | 1050- 1100 | 1150- 1200 | 1250- 1300 | 1350- 1400 | 1450- 1500 |
Notions
Gauge
12 St [Esc, Ch 1]= 5” and 11 rows in Esc= 4”
For Swatch- Ch 26 and work rows 1-11 of the pattern. Your swatch square will measure 5” wide by 4” tall.
Sizing
This Crochet Summer Top is designed to be slightly loose fitting with approximately 4” of positive ease added. The bust measurements are Finished Garment sizes not actual bust measurements!
| Size | XS | S | M | L | XL | 2XL | 3XL | 4XL | 5XL |
| Bust | 32” | 36” | 40” | 44” | 48” | 52” | 56” | 60” | 64” |
| Length | 24.5” | 25” | 25.25” | 25.5” | 25.75” | 26” | 26” | 26.5” | 26.5” |
Abbreviations Used
Ch- Chain
Yo- Yarn Over
Ch Sp- Chain Space
Esc- Extended Single Crochet
Dec- Decrease
Sc- Single Crochet
Sl St- Slip Stitch
Pattern Notes:
-This Crochet Tee is worked in 2 separate panels from the bottom up and then seamed together.
-Pattern repeat is [Esc, Ch1] in each chain space
-Ch 2 does NOT count as a Stitch throughout
Special Stitches
Extended Single Crochet– insert hook into stitch, draw up a loop. Yo, pull through one loop. Yo, pull through remaining 2 loops.

The Wren Crochet Summer Top
Instructions written XS(S, M, L, XL, 2XL, 3XL, 4XL, 5XL)
Tip: It may be helpful to place a stitch marker in your Ch 2 Turning chain if you have a hard time seeing where to place your final Esc of the rows.
Front Panel
Row 1: Ch 78 (88, 98, 108, 118, 128, 138, 148, 158) Esc in the 4th Ch from the hook, then Ch 1. *Skip the next St. Esc, Ch1 in the next* repeat from * to *in all stitches ending with an Esc in the last St. Ch 2, Turn. (38(43, 48, 53, 58, 63, 68, 73, 78 Esc)
Row 2-51: [Esc, Ch 1] in the first Ch Sp. and in each Ch Sp across, making sure to Esc in the Ch 2 turning Ch. Ch 2, Turn. (38(43, 48, 53, 58, 63, 68, 73, 78 Esc)


***Tip: if you would like your top to be longer add more rows before you split for the neckline. Be sure to add the same amount of rows to the front and back panels.***
Neckline decreases start here, you will no longer be working across the entire row
Row 52: [Esc, Ch 1] in the first 19 (21, 24, 26, 29, 31, 34, 36, 39) Ch Sp. Ch 2, Turn. (19(21, 24, 26, 29, 31, 34, 36, 39 Esc)

Row 53: Skip the first Ch Sp. [Esc, Ch 1] in the next Ch Sp and in each Ch Sp across. Ch 2, Turn. (18(20, 23, 25, 28, 30, 33, 35, 38 Esc)

Row 54: [Esc, Ch 1] in first 16 (18, 21, 23, 26, 28, 31, 33, 36) Ch Sp. There are now 2 Ch Sp remaining. Skip the next Ch Sp, then [Esc, Ch 1] in the last Ch Sp. Ch 2, Turn. (17(19, 22, 24, 27, 29, 32, 34, 37 Esc)

Row 55: [Esc, Ch 1] in each Ch Sp across. Ch 2, Turn. (17(19, 22, 24, 27, 29, 32, 34, 37 Esc)
Row 56: [Esc, Ch 1] in each Ch Sp across. Ch 2, Turn. (17(19, 22, 24, 27, 29, 32, 34, 37 Esc)
Row 57: Skip the first Ch Sp. [Esc, Ch 1] in the next Ch Sp and in each Ch Sp across. Ch 2, Turn. (16(18, 21, 23, 26, 28, 31, 33, 36 Esc)
Row 58: [Esc, Ch 1] in each Ch Sp across. Ch 2, Turn. (16(18, 21, 23, 26, 28, 31, 33, 36 Esc)
Row 59: Skip the first Ch Sp. [Esc, Ch 1] in the next Ch Sp and in each Ch Sp across. Ch 2, Turn. (15(17, 20, 22, 25, 27, 30, 32, 35 Esc)
Row 60: [Esc, Ch 1] in first 13 (15, 18, 20, 23, 25, 28, 30, 33) Ch Sp. There are now 2 Ch Sp remaining. Skip the next Ch Sp, then [Esc, Ch 1] in the last Ch Sp. Ch 2, Turn. (14(16, 19, 21, 24, 26, 29, 31, 34 Esc)
Row 61: Skip the first Ch Sp. [Esc, Ch 1] in the next Ch Sp and in each Ch Sp across. Ch 2, Turn. (13(15, 18, 20, 23, 25, 28, 30, 33 Esc)
Row 62: [Esc, Ch 1] in first 11(13, 16, 18, 21, 23, 26, 28, 31) Ch Sp. There are now 2 Ch Sp remaining. Skip the next Ch Sp, then [Esc, Ch 1] in the last Ch Sp. Ch 2, Turn. (12(14, 17, 19, 22, 24, 27, 29, 32 Esc)
Row 63: Skip the first Ch Sp. [Esc, Ch 1] in the next Ch Sp and in each Ch Sp across. Ch 2, Turn. (11(13, 16, 18, 21, 23, 26, 28, 31 Esc)
Row 64-67 (69, 70, 70, 71, 72, 72, 73, 74): [Esc, Ch 1] in each Ch Sp across. Ch 2, Turn. (11(13, 16, 18, 21, 23, 26, 28, 31 Esc)
Finish off, leaving a tail to seam shoulders.
Opposite Shoulder
Lay your panel in front of you with your finished shoulder on the left side. Join yarn with a Sl St in the Esc farthest to your right from row 51. Then Ch 2.

Repeat the instructions from the first shoulder piece.
Finish off, leaving a tail to seam shoulders.
Back Panel
Row 1: Ch 78 (88, 98, 108, 118, 128, 138, 148, 158) Esc in the 4th Ch from the hook, then Ch 1. *Skip the next St. [Esc, Ch1] in the next* repeat from * to *in all stitches ending with an Esc in the last St. Ch 2, Turn. (38(43, 48, 53, 58, 63, 68, 73, 78 Esc)
Row 2-67 (69, 70, 70, 71, 72, 72, 73, 74): [Esc, Ch 1] in the first Ch Sp. and in each Ch Sp across, making sure to Esc in the Ch 2 turning Ch. Ch 2, Turn. (38(43, 48, 53, 58, 63, 68, 73, 78 Esc)
Finish off
Construction
Lay your panels on top of one another with right sides facing each other. Using your yarn needle and the yarn tail, seam the shoulders together using the mattress stitch.
Once you have your shoulders seamed, cut a piece of yarn about 3 times as long as your side seam. Place a stitch marker on your top marking where you want your seam to stop and your armholes to start. You will be seaming from the armhole down towards the bottom. A good place to begin your seam is Row 50 then seam down to Row 13. This will create the side slits.

Sleeves
Round 1: Join yarn with a Sl St in the bottom of the arm hole opening. Ch 1. [Esc, Ch 1] 36 (40, 42, 42, 44, 46, 46, 48, 48) around the armhole opening. Join with a Sl St to the first Esc. (36(40, 42, 42, 44, 46, 46, 48, 48 Esc)

Round 2-3: Ch 1. [Esc, Ch 1] in each Ch Sp around. Join to the first Esc. (36(40, 42, 42, 44, 46, 46, 48, 48 Esc)
Finish off
Repeat for the other sleeve
Neckline Trim (optional)
Join yarn with a Sl St where the top shoulder seam. Ch 1, Sc around the neckline. Join with a Sl St to the first Sc. Repeat as many Sc rounds as desired. I made 3 Sc rounds for my neckline.

Tie Off, tuck in those ends and enjoy your new Wren Tee!

Make sure to pin this pattern for later, and if you do make one tag me @Cactus.and.lace on Instagram and use the hashtag #CactusandlaceDesigns . I can’t wait to see your Wren Tees, and I would love to share your pics! 🌵
Other Free Crochet Patterns You Might Love


The Wren Tank// The Ivy Tee// The Haven Cardi// The Baja Hoodie
Comments are closed.
Donna Fransen
May 8, 2020 at 9:50 pmI have a question for you Is the stitch tight enough that you can’t see through the shirt to skin? I don’t want to crochet something where I have to wear another shirt under it to hide my bra. Thank you.
cactusandlace.designs
May 14, 2020 at 7:10 pmHi Donna! I believe that the stitch is tight enough. I do not wear a shirt underneath them and I don’t think you can see through. 😊
Easy Crochet Tank Top~ The Wren Tank- Cactus & Lace Designs
May 20, 2020 at 12:34 pm[…] This easy crochet tank top is the perfect piece to add to your handmade wardrobe. It is very beginner friendly and uses only one stitch throughout. If you can Sc and Ch, you can make this crochet tank top. And even better, it is available in sizes XS-5XL and you can even modify this design to become a Tee. Check out The Wren Crochet Tee Free Pattern Here! […]
Easy Crochet Top~ The Summer Breeze Tank Cactus & Lace Designs
May 21, 2020 at 8:32 am[…] Wren Tank// The Wren Tee// The Ivy Tee// The Haven […]
Oversized Crochet Cardigan Free Pattern~Cactus and Lace Designs
May 22, 2020 at 10:32 am[…] Wren Tank// The Wren Tee// The Summer Breeze Tank// The Baja […]
Lara Watts
May 23, 2020 at 9:20 amLove this top! Just finished it. The directions were simple and very accurate. It was so nice to be able to relax and crochet a cute top that fits well.
cactusandlace.designs
May 23, 2020 at 9:46 amOh yay! I am so glad you like it! 🤗
Katherine
May 30, 2020 at 11:55 pmI want to tell you I love your designs. They are very beautiful and I appreciate the fact the you explain things very well and you have a great range of sizes! Not only that but I have been trying to learn foundation crochet and it was not working out even though I have also watched videos and slowed them down. The thing that did help was the fact that you said don’t forget to put the hook under both parts of the stitch. That clinched it for me thank you!
cactusandlace.designs
June 2, 2020 at 9:24 amThank you so much! That means a lot to me! I am so glad that you were able to master the foundation crochet stitch! 😊