
Beginner Crochet Cardigan ~ The Ari Cardigan ~ Free Pattern

The Ari Cardigan, is an easy, baggy sweater that is made using simple single crochet stitches making it the perfect beginner crochet cardigan.
Read through my inspiration and design process, scroll down for the Free Pattern or purchase the Full Color coded Printable PDF Here!

Inspiration + Design
Grab your hook and your lightweight yarn, and get ready to meet your new favorite everyday beginner crochet cardigan, The Ari Cardigan.
After a few designs that required a lot of focus and brain power, I decided that I needed to make something that was just mindless and simple. Something that I could easily make while watching my favorite show. Something that only used one meditative stitch. Something that can be paired with everything in my closet. And that’s when this beginner crochet cardigan came to my mind.
Whether you are a beginner crocheter looking to make your first garment or a more experienced one wanting to make a quick and easy project, this beginner crochet cardigan is the sweater for you.

A Beginner Crochet Cardigan For Everyone
What makes this crochet cardigan great is that it is probably one of the easiest designs to customize to your individual wants. It is made side to side, which means it’s constructed vertically instead of the standard horizontal construction. This also means that all you have to do to change the length of the cardigan is to add or subtract stitches from your initial chain. If you want to adjust the width of the sweater, then simply add or deduct rows from your panels. Making a custom fitted cardigan has never been so easy!
The Yarn
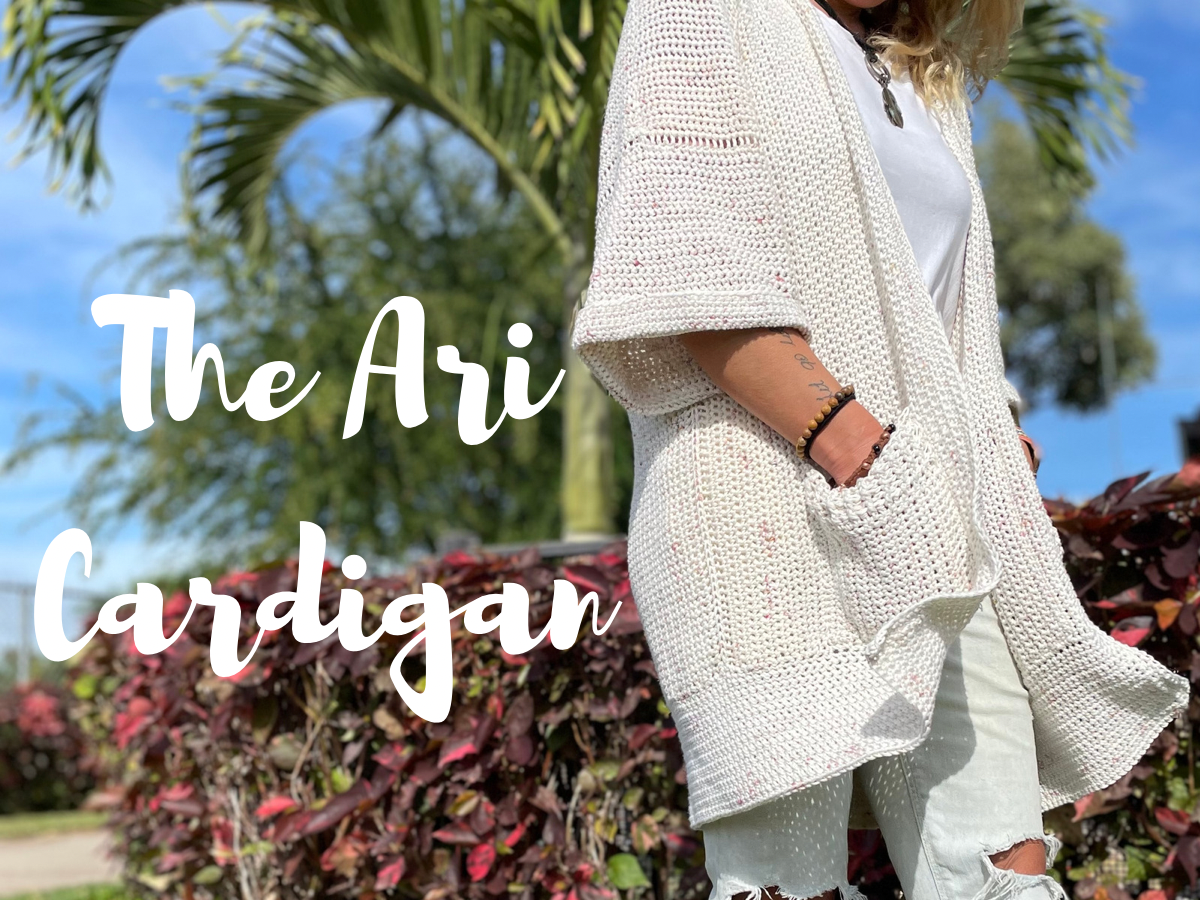
The yarn I used for this beginner crochet cardigan was a no brainer. It is one of the custom color-ways dyed on our Dk weight yarn. This particular color is called ”Love” because I’m so in love with it, that I want to make all my future designs in this color. It is a perfect off-white, creamy color with speckles of pinks, blues, and some oranges spread throughout.
If you love this color as much as I do, you can request a custom order on my Etsy shop here, and I will happily hand dye a batch for you.
Since Hand dyed yarn isn’t for everyone, I’ve included some yarn suggestions.
Pattern Links
~Purchase the Color Coded Printable PDF on Etsy.
~Purchase the Color Coded Printable PDF on LoveCrafts.
~Save it to your Ravelry Here.


To Sum it up:
The Ari cardigan is a beginner crochet cardigan that is the perfect lightweight sweater for spring and summer. It is worked in 3 panels, side to side, using only the single crochet stitch.
Yarn
Category 3 Lightweight Yarn
Below is the approximate yardage for all sizes:
| Size | XS | S | M | L | XL | 2X | 3X | 4X | 5X |
| Approx Yds | 1600 | 1750 | 1900 | 2100 | 2250 | 2450 | 2600 | 2775 | 2950 |
Notions
-Size K(6.5 mm) Hook
-Yarn Needle
Gauge
14 Sc and 19 Sc rows = 4”
Sizing
This Beginner Crochet Cardigan is made to be oversized with approximately 8-10” of positive ease. The measurements are Finished garment sizes. When choosing your size, find the bust measurement that equals approximately 8-10” larger than your actual bust measurement and make that size.
| Size | XS | S | M | L | XL | 2X | 3X | 4X | 5X |
| Bust | 38” | 42” | 46” | 50” | 54” | 58” | 62” | 66” | 70” |
| Length | 30.25” | 30.75” | 31” | 31.25” | 31.5” | 31.75” | 31.75” | 32.25” | 32.25” |
Abbreviations Used
Ch- Chain
Yo- Yarn Over
St- Stitch
Sl St- Slip Stitch
Fsc- Foundation Single Crochet
Sc- Single Crochet
Hdc- Half Double Crochet
FPhdc- Front Post Half Double Crochet
BPhdc- Back Post Half Double Crochet
Pattern Notes
-Pattern is worked side to side in 3 separate panels (a back panel and 2 front panels) and seamed together at the end.
-Sleeves are worked from the shoulder down in TURNED rounds.
-Ch 1 does NOT count as a stitch throughout.
-Total Stitches are indicated between [ ].
-The sizing guide follows size XS(S, M, L, XL, 2X, 3X, 4X, 5X). E.g. “Fsc 88(90, 91, 92, 93, 94, 94, 95, 95)” means Fsc 88 for XS, Fsc 90 for Small, Fsc 91 for Medium, Fsc 92 for Large, Fsc 93 for XL, Fsc 94 for 2X, Fsc 94 for 3X, Fsc 95 for 4X, Fsc 95 for 5X. If there is only one number, it applies to all sizes.
Special Stitches
Front Post Half Double Crochet– Yo, insert your hook into the space between the Hdc stitches, from front to back. Going around the Hdc post, bring hook back to the front. Yo, bring up a loop (3 loops on hook). Yo, pull through all 3 loops.
Back Post Half Double Crochet– Yo, insert your hook into the space between the Hdc stitches, from back to front. Going around the Hdc post, bring the hook back to the back. Yo, bring up a loop (3 loops on hook). Yo, pull through all 3 loops.

The Ari Beginner Crochet Cardigan
Sizes Written XS(S, M, L, XL, 2XL, 3XL, 4XL, 5XL)
Back Panel
Row 1: Fsc 88(90, 91, 92, 93, 94, 94, 95, 95). Ch 1, Turn. [88(90, 91, 92, 93, 94, 94, 95, 95) Sc]
*If you are uncomfortable with the Fsc, you can Ch 89(91, 92, 93, 94, 95, 95, 96, 96), Sc in the 2nd Ch from the hook and in each Ch across*
Row 2: Sc in the first St and each St across. Ch 1, Turn. [88(90, 91, 92, 93, 94, 94, 95, 95) Sc]
Repeat row 2 until you have a total of 90(99, 109, 118, 128, 137, 147, 156, 166) rows.
Finish off
*Customization Tip-
At this point, your panel should measure approximately 19(21, 23, 25, 27, 29, 31, 33, 35)” wide by 25.25(25.75, 26, 26.25, 26.5, 26.75, 26.75, 27.25, 27.25)” long. Make sure to measure your panel vertically, the amount of stitches is your length and the amount of rows is your width.
If you want your cardigan to be longer or shorter, then add or subtract Sc stitches to your foundation chain. If you want to change the width of the cardigan, then add or subtract rows.
Front Panel (make 2)
Row 1: Fsc 88(90, 91, 92, 93, 94, 94, 95, 95). Ch 1, Turn. [88(90, 91, 92, 93, 94, 94, 95, 95) Sc]
*If you are uncomfortable with the Fsc, you can Ch 89(91, 92, 93, 94, 95, 95, 96, 96), Sc in the 2nd Ch from the hook and in each Ch across*
Row 2: Sc in the first St and each St across. Ch 1, Turn. [88(90, 91, 92, 93, 94, 94, 95, 95) Sc]
Repeat row 2 until you have a total of 43(47, 52, 57, 61, 66, 71, 76, 81) rows.
Finish Off leaving a long tail to seam shoulders.
If you adjusted the length or width of the back panel, then be sure to add or subtract the same amount of stitches and rows as the back panel.
Construction
Lay your 2 front panels on top of the back panel. Make sure to line up the rows on the front and back panel to assure you sew the shoulders evenly. For example, if your front panel is 43 rows wide, you will seam up to the 43rd row of the back panel on both sides.
Using your yarn needle and yarn tails mattress seam the shoulder pieces to the back piece along the black line.
Once you have your shoulders seamed, count 55(54, 55, 53, 54, 52, 52, 49, 49) stitches from the bottom on each side and place a stitch marker. This will be your armhole. Take a piece of yarn about 3 times as long as your side, and mattress seam from the bottom of your panels up to the stitch marker. Repeat for the second panel.

Customization Tip-
If you do not want your arm holes/ sleeves to be oversized, then you can seam up a few more stitches on each side until the arm hole is desired size. Keep in mind that changing the armhole size will also alter the stitch count on the sleeves.
Sleeves
Join yarn to the under side of the arm pit area. Ch 1.
Round 1: Sc 66(72, 72, 78, 78, 84, 84, 92, 92) evenly around the arm hole opening. Join with a Sl St to the first Sc. [66(72, 72, 78, 78, 84, 84, 92, 92) Sc]
*If you altered the armhole size, the sleeve stitch count will differ. Count how many stitches are open around the armhole and Sc that amount of St around.*
Round 2: Ch 1, Turn. Sc in each St around. Join with a Sl St to the first Sc. [66(72, 72, 78, 78, 84, 84, 92, 92) Sc]
Repeat round 2 until you have a total of 34 rounds or until your sleeves reach the desired length. Keep in mind that you will be turning your sleeve up approximately 1.5” at the end.
Finish off
Border
With your cardigan laying in front of you, join yarn in the bottom left hand corner. Ch 1.

Row 1: Sc 32(35, 38, 42, 46, 49, 53, 56, 60) across the first front panel. Sc 67(74, 80, 88, 95, 102, 109, 116, 123) across the back panel. Sc 32(35, 38, 42, 46, 49, 53, 56, 60) across the second front panel. Ch 1, Turn. [131(144, 156, 172, 187, 200, 215, 228, 243) Sc]
Row 2: Ch 1, Turn. Sc in each St across. [131(144, 156, 172, 187, 200, 215, 228, 243) Sc]
Repeat row 2 until you have a total of 24 rows.
Do not finish off. You will now Ch 1 and turn your work so that you are working along the collar of your cardigan.
Row 1: Sc evenly around the edges of the first front, around the neckline, and back down the second front. Make sure to use the same amount of Sc on both sides of the sweater. When you reach the bottom corner of the Left front panel, Ch 1 and Turn.
Row 2- Row 3: Sc in each St across.
Finish off
Pockets (Optional)
Row 1: Ch 17. Sc in the 2nd Ch from the hook and in each Ch across. Ch 1, Turn. [16 Sc]
Row 2: Sc in each St across. Ch 1, Turn. [16 Sc]
Repeat row 2 until you have a total of 28 rows.
Do not finish off, you will now turn your work so that you are working along the top of the pocket.
Row 1: Sc 21 evenly across the top of the pocket. Ch 1, Turn. [21 Sc]
Row 2: Hdc in each St across. Ch 1, Turn. [21 Hdc]
Row 3: Hdc in the first St. *FPhdc in the next St, BPhdc in the next St.* Repeat from * to * across, until you get to the last St. Hdc in the last St. Ch 1, Turn. [21 Hdc]
Row 4- Row 8: Repeat row 3.
Finish off leaving a long tail to attach pocket to cardigan.
Attaching Pockets
Lay your sweater in front of you. Position the pockets where you like them. I lined the bottom of my pocket up with the top of the border section on both front panels about 8 rows from the collar. Using your yarn tail, mattress stitch the pocket to the cardigan.

Sleeve Cuff (optional)
Turn sleeves up about 1.5”. Tack in place in 3-4 different spots so that the cuff doesn’t fall.

Tie off, tuck in those ends and enjoy your new Ari Cardigan!
Make sure to pin this pattern for later, and if you do make one tag me @Cactus.and.lace on Instagram and use the hashtag #CactusandlaceDesigns . I can’t wait to see your Ari Cardigans, and I would love to share your pics! 🌵
Other Free Crochet Patterns You Might Love


The Harper Tee// The Haven Cardigan// The Kahe Kai Top// The Aurelia Top
Comments are closed.
The Evie Crochet Cropped Cardigan ~Free Pattern~ Cactus&Lace Designs
April 11, 2022 at 9:52 pm[…] The Ari Cardigan // The Austyn Pullover // The Haven Pullover // The Harper Tee […]