
The Harper Cropped Tee~ Crochet Shirt ~ Free Pattern

A super simple yet stylish Crochet Shirt, the Harper Tee is a Free beginner friendly pattern on the blog!
Read through my inspiration and design process, scroll down for the Free Pattern or purchase the Full Color coded Printable PDF Here!

Inspiration + Design
After about 2 months of being put off, the Harper Cropped crochet shirt is finally making its way on to the blog. Creating the cropped version of the Harper tee was really a no brainer since it already has a hip length and a tunic length variation. I honestly just never thought of adding a cropped version because I’m not really much of a crop top kinda girl, but every once in a while you gotta get out of your comfort zone and try something new.

The Yarn
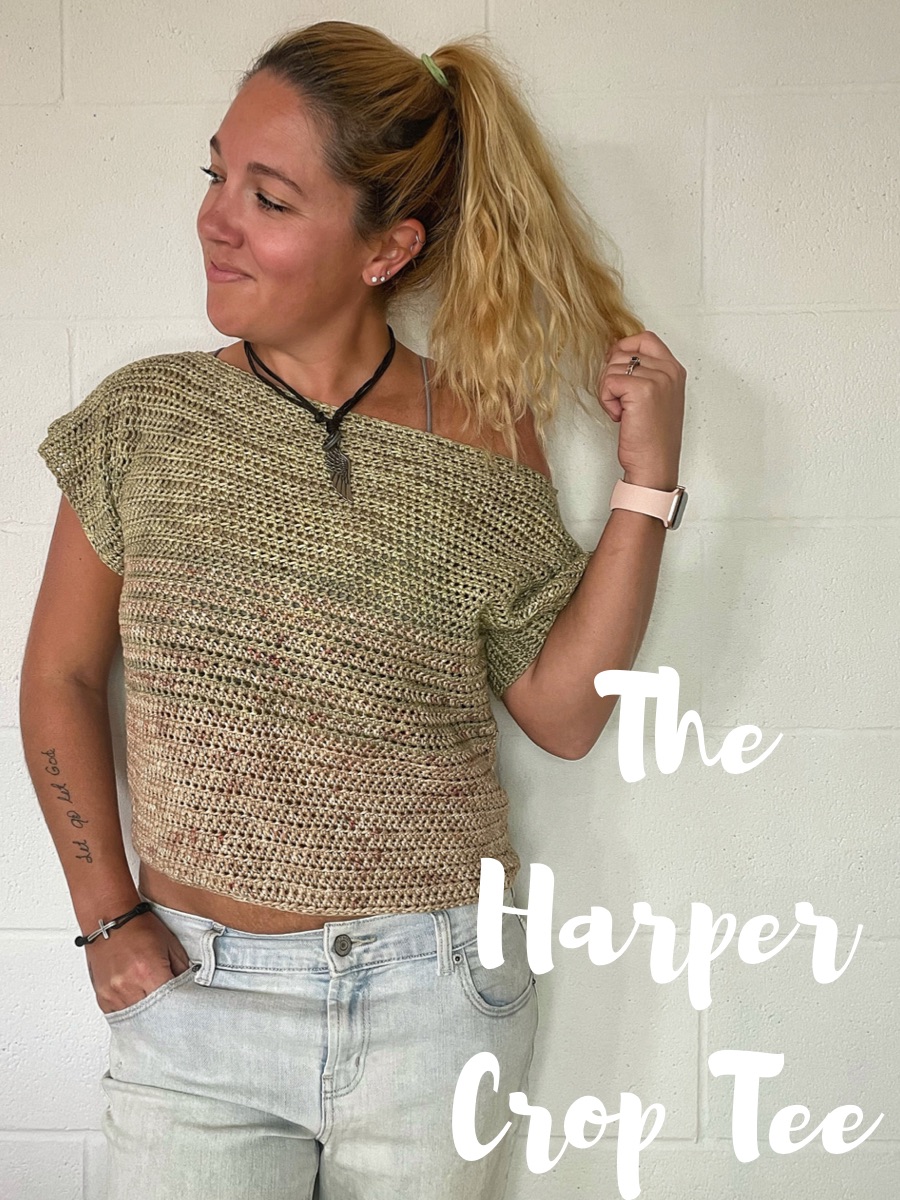
The Yarn….. this yarn is probably one of the main reasons why I decided to create this Crochet Shirt now. It uses 2 of our hand dyed custom color-ways and I honestly believe that these colors were made just for this top! Both of these colors were dyed on our Category 3 Light weight Cotton/ Bamboo Blend Yarn Base. The Plant fibers create an extremely soft and breathable fabric that is absolutely perfect for making wearables. I know a lot of you maybe weary of plant based fibers, but I urge you to step out of your comfort zone and give it a try. I promise you won’t regret it!
The First of the colors I used is “Wanderer”. It is a light tan color resembling a dry grassy field, with specks of pinkish-red scattered throughout. And the second color is “Grassy Fields”, a light olive green color with subtle hints of lighter and darker green shades throughout.
Shop All our Made to Order Custom Color-Ways Here!

Pattern
~Purchase the Color Coded PDF with all 3 lengths Here.
~Save it to your Ravelry Here.

To Sum it up:
The Harper Tee is a beginner crochet shirt, that is made in 2 separate “T” shaped panels and seamed together at the end. It comes in 3 different lengths, Crop Length, Hip length and Tunic Length making this top suitable for everyone! Find the Hip and Tunic Lengths Here!

Yarn
Category 3- Light, Dk weight Yarn
Below is the approximate yardage for all sizes:
| Size | XS | S | M | L | XL | 2X | 3X | 4X | 5X |
| Approx Yds | 550 | 650 | 700 | 775 | 825 | 900 | 975 | 1050 | 1100 |
Notions
-Size G (4.0 mm) Hook
-Yarn Needle
-Stitch Markers
Gauge
Gauge before Blocking
15 Hdc and 12 Hdc Rows = 4”
Gauge after Blocking
14 Hdc and 11 Hdc rows = 4”
**It is very important to check gauge before you begin to ensure proper fit**
Sizing
This Crochet Shirt is made to be slightly loose fitting, with approximately 1”-2” of positive ease added. The measurements are Finished garment sizes, not actual bust measurements. When choosing your size, find the bust measurement that equals approximately 2” more than your actual bust measurement and make that size. Length measurements are taken with top laying flat after blocking.
| Size | XS | S | M | L | XL | 2X | 3X | 4X | 5X |
| Bust | 32” | 36” | 40” | 44” | 48” | 52” | 56” | 60” | 64” |
| Length | 18” | 19” | 19.5” | 19.5” | 19.5” | 20” | 20” | 20.5” | 20.5” |
Abbreviations Used
Ch- Chain
Yo- Yarn Over
St- Stitch
Fhdc- Foundation Half Double Crochet
Hdc- Half Double Crochet
Pattern Notes
-Pattern is worked in 2 identical “T” shaped panels from bottom up
-Ch 2 does NOT count as a stitch throughout
-First Color is “Wanderer”. The second color is “Grassy Fields”
-Total Stitches are indicated between [ ]
-The sizing guide follows size XS(S, M, L, XL, 2X, 3X, 4X, 5X). E.g. “Ch 58(65, 72, 79, 86, 93, 100, 107, 114)” means Ch 58 for XS, Ch 65 for Small, Ch 72 for Medium, Ch 79 for Large, Ch 86 for XL, Ch 93 for 2X, Ch 100 for 3X, Ch 107 for 4X, Ch 114 for 5X. If there is only one number, it applies to all sizes.

The Harper Cropped Tee ~ Crochet Shirt
Instructions written XS(S, M, L, XL, 2X, 3X, 4X, 5X)
Panels
*Make 2
Bottom Section
With First Color
Row 1: Fhdc 56(63, 70, 77, 84, 91, 98, 105, 112). Ch 2, Turn.
*If you are uncomfortable with the Fhdc, you can Ch 58(65, 72, 79, 86, 93, 100, 107, 114), Hdc in the 3rd Ch from the hook and in each Ch across*
Row 2: Hdc in the first St and each St across. Ch 2, Turn. [56(63, 70, 77, 84, 91, 98, 105, 112)]
Repeat row 2 until your panel measures approximately 5.5(6, 6, 5.75, 5.5, 5.5, 5.5, 5.5, 5.5)” or until you have completed 15(17, 17, 16, 15, 15, 15, 15, 15) rows.
Striped Section
Row 1: Hdc in the first St and each St across until the very last St. Hdc in the last St but before you finish the St, Yo in your new color and finish the Hdc with the new color. Ch 2, Turn. [56(63, 70, 77, 84, 91, 98, 105, 112)]
This is where we will begin to make the stripes, you will now be carrying the first color along with you behind the second color and changing the color at the end of each row.

Row 2: In the second color, Hdc in the first St and each St across. (Make sure to carry your first color with you and switch to the first color at the end of the row.) Ch 2, Turn. [56(63, 70, 77, 84, 91, 98, 105, 112)]
Tip: Right before changing colors, it is helpful to check to make sure that the non dominant color yarn is not peeking through the front of your work or bunching up. If it is, simply give the non dominant yarn a gentle tug to even out the stitches.
Row 3: In the first color, Hdc in the first St and each St across. (Make sure to carry your second color with you and switch to the second color at the end of the row.) Ch 2, Turn. [56(63, 70, 77, 84, 91, 98, 105, 112)]
Repeat Rows 2 and 3 until your panel measures approximately 10.5(11.25, 11.25, 11, 10.5, 10.5, 10.5, 10.5, 10.5)” or until you have completed 14 rows.
***Finish off with the First Color. The remainder of the top will be made in the second color.***
Top Section
Ch 16, Turn.

Row 1: Sk 2 the first 2 Ch St. Hdc across the remaining 14 Ch stitches, Hdc across the body stitches. Ch 16, Turn. Sk 2 St. [70(77, 84, 91, 98, 105, 112, 119, 126) Hdc only]


Row 2: Sk 2 the first 2 Ch St. Hdc across the remaining 14 Ch stitches and in each St across. Ch 2, Turn. [84(91, 98, 105, 112, 119, 126, 133, 140)]
Row 3: Hdc in the first St and each St across. Ch 2, Turn. [84(91, 98, 105, 112, 119, 126, 133, 140)]
Repeat Row 3 until your panel measures 18(19, 19.5, 19.5, 19.5, 20, 20, 20.5, 20.5)” or until you have completed 21(22, 23, 24, 25, 26, 26, 27, 27) rows.
Finish off leaving a long tail to seam up the shoulders.
Construction
Lay your panels on top of one another with right sides facing each other. Using your yarn needle and the yarn tail, seam the shoulders together using the mattress stitch. It is helpful to use stitch markers to mark how far in you will be sewing. I sewed approximately 7” or 25 Stitches inward from the edge of both sleeves. You can customize the size of your neckline by adding or reducing the number of stitches you seam.
Once you have your shoulders seamed, cut a piece of yarn about 3 times as long as your side seam. Beginning at the bottom corner of your sleeve, mattress stitch down to the bottom of your top.

Tie off, tuck in those ends and enjoy your new Harper Crop Tee!
Make sure to pin this pattern for later, and if you do make one tag me @Cactus.and.lace on Instagram and use the hashtag #CactusandlaceDesigns . I can’t wait to see your Harper Tees, and I would love to share your pics! 🌵
Other Free Crochet Patterns You Might Love


The Sprinter Tank// The Haven Tank// The Aurelia Tee// The Ivy Top