
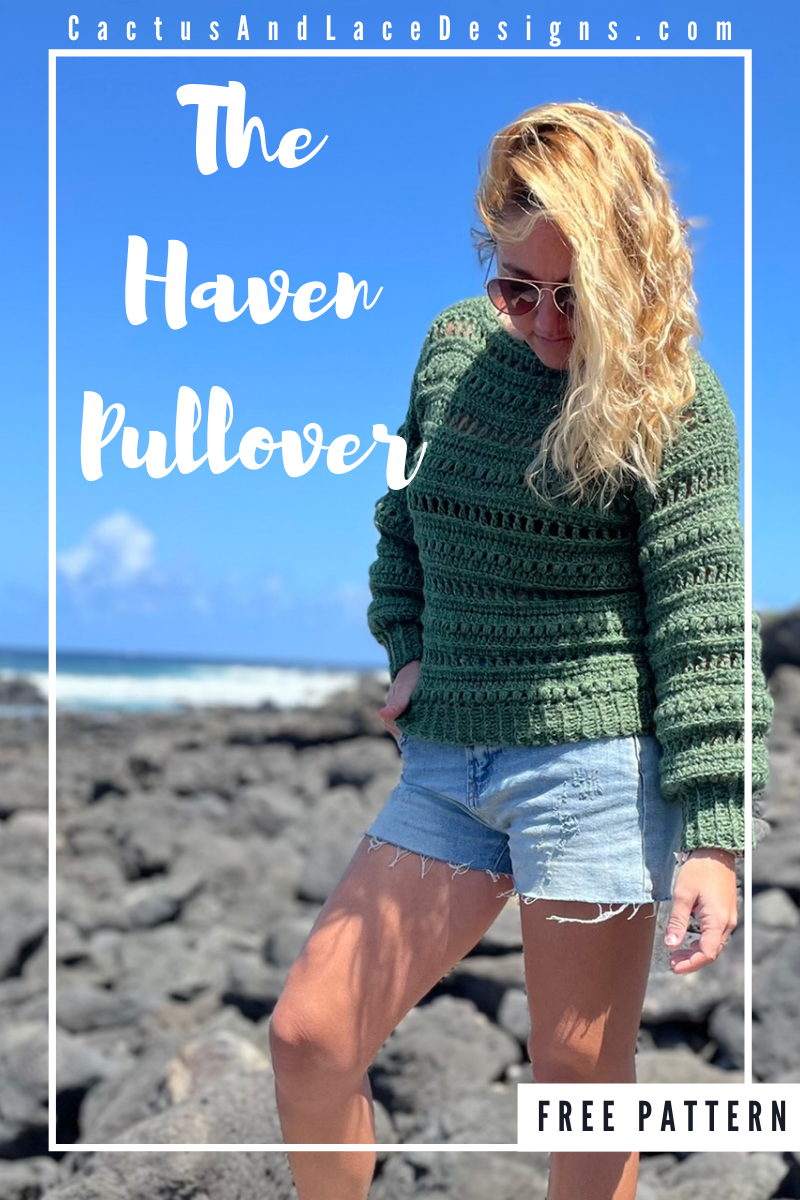
The Haven Pullover~ Easy Crochet Sweater ~Free Pattern

An Easy Crochet Sweater with Boho flare ~ The Haven Pullover ~ is a beginner friendly Free Pattern here on the Blog!
Read through my inspiration and design process, scroll down for the Free Pattern or purchase the Full Color coded Printable PDF Here!

Inspiration + Design
Sometimes the very best ideas are the ones that are right in front of your face and you wonder why you didn’t think of it sooner! That’s exactly how I feel about this easy crochet sweater!
A year ago, as a newbie crochet designer, I took on the task of creating my very first crochet cardigan, The Haven Cardi. The response to that design has and continues to amaze me everyday. It is by far my most popular design to date, so I don’t know why it took me so long to think about making a pullover version.

Same Easy Crochet Sweater, Different Look
Since I already had the stitch pattern and concept nailed down, all that was left to do was to decide on a construction method. So I decided to try something a little different with this design. This whole easy crochet sweater is made from the bottom up in the round, then splits at the arm holes and is then worked in rows to create the front and back panel. Using this construction method makes for a nearly seamless sweater!
The Yarn
For this Easy Crochet Sweater, I used Yarn Bee Warm & Cozy, a size 4 worsted weight yarn from Hobby Lobby. I have had a few skeins of this yarn in my stash for quite a while just waiting for the perfect project. So when I decided to make a Haven Pullover, I knew that this was the prefect project for this yarn. It is an acrylic, nylon and polyester blend which makes this yarn super easy to work with and gives the finished project a “not too hot but not too cool“ feel.
Another yarn I would highly suggest for this easy crochet sweater would be Lion Brand Basic Stitch Anti-Pilling Yarn. That is the yarn I used for The Haven Cardi and it not only works up super soft and cozy, but the fact that it is anti-pilling is even better! Not to mention, that Lion Brand just came out with a whole new Color Theory yarn and those colors are just dreamy!

Pattern
~Purchase the Color Coded Printable PDF with full photo tutorial Here.
~Save it to your Ravelry Here.


To Sum it up:
The Haven Pullover is an easy crochet sweater that is made seamlessly in the round from the bottom up. The unique extended stitches paired with a worsted weight yarn make this sweater work up in a flash! But don’t let the look of this easy crochet sweater intimidate you, it uses all beginner friendly stitches and if you need a little more help, I have included a detailed photo tutorial in the inexpensive PDF.
Yarn
Lion Brand Basic Stitch Yarn or appropriate size 4 worsted weight yarn substitute.
Below is the approximate yardage for all sizes:
| Size | XS | S | M | L | XL | 2X | 3X | 4X | 5X |
| Approx Yds | 900-950 | 950-1000 | 1050-1100 | 1150-1200 | 1300-1350 | 1400-1450 | 1500-1550 | 1600-1650 | 1750-1800 |
Notions
-Size K (6.5 mm) Hook
-Yarn Needle
-Stitch Markers
Gauge
13 St and 6 rows in Extended Hdc in the BLO = 4”
Sizing
This Easy Crochet Sweater is made with a classic fit, with approximately 2” of positive ease added. The measurements are Finished garment sizes, not actual bust measurements. When choosing your size, find the bust measurement that equals approximately 2” more than your actual bust measurement and make that size.
| Size | XS | S | M | L | XL | 2X | 3X | 4X | 5X |
| Bust | 31” | 35” | 39” | 43” | 47” | 51” | 55” | 59” | 63” |
| Length | 20.5” | 20.5” | 21.5” | 21.5” | 22” | 22” | 22” | 22.5” | 22.5” |
Abbreviations Used
St- Stitch
Ch- Chain
Yo- Yarn Over
Sl St- Slip Stitch
Sc- Single Crochet
Blo- Back Loop Only
Ehdc- Extended Half Double Crochet
Edc- Extended Double Crochet
Ps- Puff Stitch
Pattern Notes
-Pattern is worked from the bottom up in one piece and then divided for the armholes.
-Main portion and sleeves are worked in TURNED rounds. After you have joined with a slip stitch to end each round, Turn your work so that the next round is worked in the opposite direction.
-Chain Stitches Do NOT count as stitches throughout.
-Easy Crochet Sweater is worked in a 6 row repeat; The row repeat is as follows- Ehdc, Ehdc, Ps, Ehdc, Ehdc, Edc.
-All stitches are worked in the Back loop only EXCEPT for the Ps rows which are worked through both loops.
-Total Stitches are indicated between [ ].
-The sizing guide follows size XS(S, M, L, XL, 2X, 3X, 4X, 5X). E.g. “Sc 100(114, 126, 140, 152, 166, 178, 192, 204)” means Sc 100 for XS, Sc 114 for Small, Sc 126 for Medium, Sc 140 for Large, Sc 152 for XL, Sc 166 for 2X, Sc 178 for 3X, Sc 192 for 4X, Sc 204 for 5X. If there is only one number, it applies to all sizes.
Special Stitches
Extended Half Double Crochet– Yo, insert hook into the next St. Draw up a loop (3 loops on hook). Yo, pull through one loop then Yo, pull through remaining 3 loops.
Extended Double Crochet– Yo, insert hook into the next St. Draw up a loop (3 loops on hook). Yo, pull through one loop then Yo, pull through 2 loops. Yo, pull through remaining 2 loops.
Puff Stitch– Yo, insert hook into next stitch and bring up a loop, you now have 3 loops on your hook. Then, Yo, insert hook back into the same stitch, and bring up a loop, you now have 5 loops on your hook. Repeat this 2 more times (4 times total) ending with 9 loops on your hook. Yo, pull through all the loops, and finish with a Ch 1.

Easy Crochet Sweater ~The Haven Pullover
Sizes Written XS(S, M, L, XL, 2XL, 3XL, 4XL, 5XL)
Starting with the ribbing.
Ch 11
Row 1: Sc in the 2nd Ch from the hook and in each Ch across. Ch 1, Turn (10)
Row 2 – Row 89(103, 115, 129, 141, 155, 167, 181, 193): Sc in the Blo across. Ch 1, Turn. (10)
Do not Fasten Off
You will now be connecting the two short ends of the ribbing by slip stitching them together.
Fold the ribbing with the short sides together (row 1 & row 89, 103, 115, 129, 141, 155, 167, 181, 193).
Going through both loops on each end of the band, Sl St the edges together. (10 Sl St)
Ch 1 and flip the band to where the seam is now on the inside of the band and turn your ribbing to face you.
You will now start working the main portion of the pullover.
A Full Stitch Tutorial to walk you through the tricky parts of the pattern is available in the Printable PDF.
Round 1: 2 Sc in the first St (where your Ch 1 is), then *Sc in the next 7(9, 10, 11, 12, 14, 15, 16, 17) St, then 2 Sc in the next * a total of 10 times ending with a Sc in the remaining 8(2, 4, 8, 10, 4, 6, 10, 12) stitches. [100(114, 126, 140, 152, 166, 178, 192, 204) Sc]
***This portion of the pullover is worked in TURNED rounds. Join at the end of each round with a Sl St and then TURN your work so that your next round will be worked in the opposite direction.***
Round 2: Ch 1, Turn. Ps in the same space as your Ch 1 (don’t forget your Ch 1 to secure the Ps after each one), skip the next St, Ps in the following St. Continue around, ending with a Ps in the second to last St, join into your first Ps. [50(57, 63, 70, 76, 83, 89, 96, 102) Ps]
Round 3-4: Ch 2, Turn. Working in the Blo, Ehdc in the first St and around. Join with a Sl St to your first Ehdc. [100(114, 126, 140, 152, 166, 178, 192, 204) Ehdc]
Round 5: Ch 3, Turn. Working in the Blo, Skip the first St (where the Ch 3 is) *Edc, Ch 1 in the next St, skip the next St*. Repeat from * to * around ending with an Edc in the last St. Join with a Sl St to the top of the Ch 3. [50(57, 63, 70, 76, 83, 89, 96, 102) Edc]
Round 6-7: Repeat round 3 & 4.
***Reminder- All rows are worked in the BLO with the exception of the Ps rows which are worked through both loops.***
Round 8- Round 18: Repeat rows 2-7
All Sizes will end in an Ehdc row.
Do not Finish off. This is where we will divide for arm holes.
***If you would like your sweater to be shorter or longer simply add or omit rows before you divide for your arm holes and continue working in the pattern row repeat***
You will no longer be working in rounds but in rows to make a front and back panel.
With working yarn still attached begin your front panel.
Front Panel
Row 19: Ch 2, Turn. Ehdc in the Blo of the first St and in each of the next 49(55, 61, 69, 75, 81, 87, 95, 101) stitches. You will leave the rest of the row unworked. [50(56, 62, 70, 76, 82, 88, 96, 102) Ehdc]
Row 20: Ch 1, Turn. Skip the first St. *Ps next (don’t forget your Ch 1 to secure the Ps after each one), skip the next St*. Repeat from * to * across ending with a Ps in the last St. [25(28, 31, 35, 38, 41, 44, 48, 51) Ps]
Row 21: Ch 2, Turn. Ehdc in the Blo of the first St and each St across. [50(56, 62, 70, 76, 82, 88, 96, 102) Ehdc]
Row 22: Ch 2, Turn. Ehdc in the Blo of the first St and each St across. [50(56, 62, 70, 76, 82, 88, 96, 102) Ehdc]
Row 23: Ch 3, Turn. Skip the first St (where the Ch 3 is). *Edc in the Blo of the next St, Ch 1. Skip the next St.* Repeat from * to* across ending with an Edc in the last St. [25(28, 31, 35, 38, 41, 44, 48, 51) Edc]
Row 24: Ch 2, Turn. Ehdc in the Blo of the first St and each St across. [50(56, 62, 70, 76, 82, 88, 96, 102) Ehdc]
Row 25 – Row 30(31, 32, 32, 33, 33, 34, 34, 36): Repeat rows 19-24.
Sizes XS, S, XL, 2XL, 3XL, 4XL & 5XL will end in an Ehdc row.
Sizes M & L will end in a Ps row.
Finish off leaving a long tail to seam shoulders.
Back Panel
Sizes S, M, 2XL & 3XL Only
With your front panel in front of you, skip the stitch immediately to the left of the front panel and join yarn in the next stitch.

Sizes XS, L, XL, 4XL & 5XL
With your front panel in front of you, join yarn in the stitch immediately to the left of the front panel.

Row 19: Ch 2. Ehdc in the Blo of the first St and in each of the next 49(55, 61, 69, 75, 81, 87, 95, 101) stitches. [50(56, 62, 70, 76, 82, 88, 96, 102) Ehdc]
Row 20: Ch 1, Turn. Skip the first St. *Ps next (don’t forget your Ch 1 to secure the Ps after each one), skip the next St*. Repeat from * to * across ending with a Ps in the last St. [25(28, 31, 35, 38, 41, 44, 48, 51) Ps]
Row 21: Ch 2, Turn. Ehdc in the Blo of the first St and each St across. [50(56, 62, 70, 76, 82, 88, 96, 102) Ehdc]
Row 22: Ch 2, Turn. Ehdc in the Blo of the first St and each St across. [50(56, 62, 70, 76, 82, 88, 96, 102) Ehdc]
Row 23: Ch 3, Turn. Skip the first St (where the Ch 3 is). *Edc in the Blo of the next St, Ch 1. Skip the next St.* Repeat from * to* across ending with an Edc in the last St. [25(28, 31, 35, 38, 41, 44, 48, 51) Edc]
Row 24: Ch 2, Turn. Ehdc in the Blo of the first St and each St across. [50(56, 62, 70, 76, 82, 88, 96, 102) Ehdc]
Row 25 – Row 30(31, 32, 32, 33, 33, 34, 34, 36): Repeat rows 19-24.
Sizes XS, S, XL, 2XL, 3XL, 4XL & 5XL will end in an Ehdc row.
Sizes M & L will end in a Ps row.
Finish off leaving a long tail to seam shoulders.
Seaming the shoulders
With your sweater laying in front of you, use your yarn needle and yarn tail to seam the shoulders together using the mattress stitch. It is helpful to use stitch markers to mark how far in you will be sewing. I sewed approximately 4” or 13 Stitches inward from the edge of both sides. You can customize the size of your neckline by adding or reducing the number of stitches you seam.

Sleeves (Make 2)
Cuff
Ch 15
Row 1: Sc in the second Ch and in each Ch across. Ch 1, Turn. (14)
Row 2-26( 26, 26, 26, 31, 31, 31, 31, 36): Sc in the Blo across. Ch 1, Turn. (14)
Do not fasten off.
You will now be connecting the two short ends of the cuff by slip stitching them together.
Fold the cuff with the short sides together (row 1 & row 26, 26, 26, 26, 31, 31, 31, 31, 36). Going through both loops on each end of the band, SL ST the edges together. (14 Sl St)
Ch 1 and flip the band to where the seam is now on the inside of the band and turn your cuff to face you.
You will now start working the main portion of the sleeves.
Round 1: 2 Sc in the first St (where your Ch 1 is) and in each stitch around. Join with a Sl St to first Sc. [54(54, 54, 54, 64, 64, 64, 64, 74) Sc]
***This portion of the sleeves is worked in TURNED rounds. Join at the end of each round with a Sl St and then TURN your work so that your next round will be worked in the opposite direction.***
Round 2: Ch 1,Turn. Ps in the same space as your Ch 1 (don’t forget your Ch 1 to secure the Ps after each one), skip the next St, Ps in the following St. Continue around, ending with a Ps in the second to last St, join into your first Ps. [27(27, 27, 27, 32, 32, 32, 32, 37) Ps]
Round 3-4: Ch 2, Turn. Working in the Blo, Ehdc in the first St and around. Join with a Sl St to your first Ehdc. [54(54, 54, 54, 64, 64, 64, 64, 74) Ehdc]
Round 5: Ch 3, Turn. Working in the Blo, Skip the first St (where the Ch 3 is) *Edc, Ch 1 in the next St, skip the next St*. Repeat from * to * around ending with an Edc in the last St. Join with a Sl St to the top of the Ch 3. [27(27, 27, 27, 32, 32, 32, 32, 37) Edc]
Round 6-7: Repeat rows 3 & 4
Round 8-23(24, 24, 26, 26, 26, 26, 27, 27): Repeat rows 2-7
***If you would like your sleeves to be shorter or longer simply omit or add more rows before you finish off.***
Finish off leaving a long tail to sew the sleeves to your sweater.
Attaching sleeves
Turn your sweater and your sleeves which ever way you choose is wrong side out. Line up your sleeve seam with the under side of the armhole and mattress seam around the arm hole.
Turn your sweater right side out.
Tie off, tuck in those ends and enjoy your new Haven Pullover!
Make sure to pin this pattern for later, and if you do make one tag me @Cactus.and.lace on Instagram and use the hashtag #CactusandlaceDesigns . I can’t wait to see your Haven Pullovers, and I would love to share your pics! 🌵
Other Free Crochet Patterns You Might Love


The Carli Cardigan// The Nomad Sweater// The Haven Cardi// The Remi Cardigan