
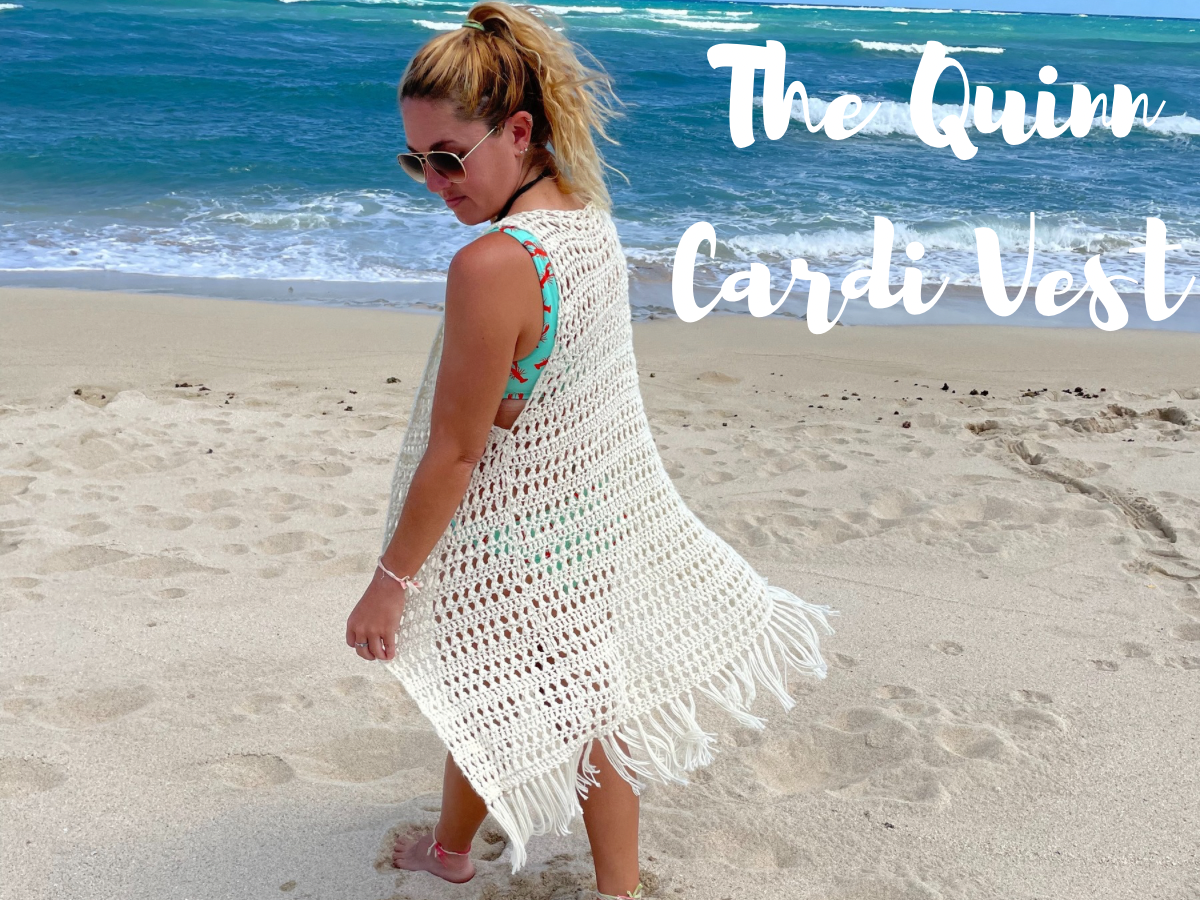
Quinn Crochet Boho Vest Pattern

The Quinn Cardi Vest is a Crochet Boho Vest made with light weight cotton yarn, and simple open stitches making it perfect to throw on over tank tops, sundresses or even swimsuits!
Get the free pattern below or purchase the ad-free, color coded PDF here.

The Quinn Crochet Boho Vest
If you’ve been around for a while, you may have noticed that this is not exactly a new design…….
This crochet boho vest is actually one of my very first crochet patterns that I ever designed. It quickly became one of my bestsellers and has stayed at the top of the list for the last 5 years!
I’ve learned so much about designing and pattern writing over these past few years so it was about time that this little gem got a much deserved makeover plus a permanent place here on the blog. With the new version I have added sizes 3XL-5XL, updated some of the numbers to have it make more sense, and updated the pattern to my current pattern writing style.
If you have previously purchased the PDF version of this pattern and you would like the updated version, please message me on Etsy with your invoice number and I will email you the new updated version.

Inspiration + Design
Let me share the story behind the creation of my Crochet Boho Vest. My fashion philosophy revolves around simplicity and elegance. I love looking stylish without the hassle of chasing every new trend or breaking the bank. Instead, I take pride in crafting my own fabulous pieces that not only look great but also stand the test of tim
Versatility is key for me. I adore clothing that can adapt to different occasions and styles, embodying the perfect blend of simplicity and flair. This mindset led to the creation of my crochet boho vest during a scorching summer in Texas. If you’ve ever experienced a Texan summer, you know the heat is no joke! I needed something cute, airy, and comfortable to beat the heat.

Yarn
Choosing the right yarn was crucial, and cotton was an obvious choice for its breathability. Luckily, Lion Brand had just introduced their new Comfy Cotton Blend. This lightweight, size 3 yarn was ideal, offering dreamy colors and perfect texture for my design. Unfortunately, this particular yarn is no longer available from Lion Brand.
However, I worked up the second version of my crochet boho vest in Lion Brand Coboo. It is also a category 3 light weight yarn and it’s a cotton/ bamboo blend. It is by far one of my most favorite yarns to work with. If you decide to make this vest, I highly recommend using this yarn.
Some other yarn suggestions: Lion Brand 24/7 Cotton Dk, Yarn Bee Sugar Wheel Cotton, Yarn Bee Bamboo-Tiful, and CotLin from Crochet.com

Construction
My design approach is always straightforward and practical. This crochet boho vest is made from three separate panels – one back panel and two front panels – which are then seamed together. To give it a unique and airy look, I opted for crossed treble crochet stitches. They may appear intricate, but I assure you, they are much simpler than they seem. Plus, the pattern includes a comprehensive stitch tutorial to guide you through every step.
Creating this vest was a delightful experience, blending practicality with style to craft a piece that’s not only beautiful but also versatile and enduring. I hope it inspires you to embrace the joy of handmade fashion and add your own touch of boho chic to your wardrobe.
Pattern Links
~Purchase the Ad-Free, Color Coded Printable PDF on Etsy.
~Purchase the Ad-Free, Color Coded Printable PDF on LoveCrafts.
~Save it to your Ravelry Here.

Supplies + Materials
Category 3 Light Dk Weight Yarn
Approximately 550(650, 750, 800, 850, 900, 1000, 1150, 1250)yards
-Size J (6 mm) Hook
-Yarn Needle
-Stitch Markers (optional)
Gauge
15 Dc and 2 (1 Dc row and 2 “X” row) sections = 5” (6 pattern rows)
For gauge swatch Fdc 16 and work rows 1-6 of the pattern. Your 15 Dc stitches will measure 5” wide and your 6 rows will be 5” tall.
Sizing
This Crochet Boho Vest is made to be oversized with approximately 6” of positive ease added. The measurements are Finished garment sizes. When choosing your size, find the bust measurement that equals approximately 6” more than your actual bust measurement and make that size.
| Size | XS | S | M | L | XL | 2X | 3X | 4X | 5X |
| Bust | 36” | 40” | 44” | 48” | 52” | 56” | 60” | 64” | 68” |
| Length | 30” | 30” | 32.5” | 32.5” | 32.5” | 33” | 33” | 33” | 33” |
Abbreviations Used
Ch- Chain
Yo- Yarn Over
St- Stitch
Fdc- Foundation Double Crochet
Dc- Double Crochet
Tr- Treble Crochet
Dc2tog- Double Crochet two Together
Pattern Notes
-Vest is worked in 3 panels, a back panel and 2 front panels.
-Chain Stitches DO NOT count as a stitch throughout.
-Vest is worked in a 3 row repeat; The row repeat is as follows- Xtr, Xtr, Dc.
-Length of the Vest can be adjusted by adding/taking away rows before the decreases begin.
-Total Stitches are indicated between [ ].
-The sizing guide follows size XS(S, M, L, XL, 2X, 3X, 4X, 5X). E.g. “Ch 54(60, 66, 72, 78, 84, 90, 96, 102)” means Ch 54 for XS, Ch 60 for Small, Ch 66 for Medium, Ch 72 for Large, Ch 78 for XL, Ch 84 for 2X, Ch 90 for 3X, Ch 96 for 4X, Ch 102 for 5X. If there is only one number, it applies to all sizes.
Special Stitches
Crossed Treble Stitch -Skip the next stitch, Tr into the following stitch. Then working behind the Tr stitch that you just made, Tr into the previously skipped stitch.


The Quinn Cardi Vest
Sizes Written XS(S, M, L, XL, 2XL, 3XL, 4XL, 5XL)
Back Panel
Row 1: Fdc 54(60, 66, 72, 78, 84, 90, 96, 102). Turn. [54(60, 66, 72, 78, 84, 90, 96, 102) Dc]
*If you are uncomfortable with the Fdc, you can Ch 56(62, 68, 74, 80, 86, 92, 98, 104), Dc in the 3rd Ch from the hook and in each Ch across. Turn.*
Row 2: Ch 3. Tr in the first St (where your Ch 3 is). *Skip the next St, Tr in the next St. Then, working behind the Tr you just made, Tr in the skipped St (one X created).* Repeat from * to * across until you have 1 St remaining. Tr in the last St. Turn. [54(60, 66, 72, 78, 84, 90, 96, 102) Tr]
Row 3: Ch 3. Tr in the first St (where your Ch 3 is). *Skip the next St, Tr in the next St. Then, working behind the Tr you just made, Tr in the skipped St (one X created).* Repeat from * to * across until you have 1 St remaining. Tr in the last St. Turn. [54(60, 66, 72, 78, 84, 90, 96, 102) Tr]
Row 4: Ch 2. Dc in the first St and each St across. Turn. [54(60, 66, 72, 78, 84, 90, 96, 102) Dc]
Repeat rows 2-4 until you have a total of 24 rows, ending on an X row.
Row 25: Ch 2. Dc2tog three times, Dc 42(48, 54, 60, 66, 72, 78, 84, 90), Dc2tog three times. Turn. [48(54, 60, 66, 72, 78, 84, 90, 96) Dc]
Row 26- Row 27: Repeat rows 2-3. [48(54, 60, 66, 72, 78, 84, 90, 96) Tr]
Row 28: Ch 2. Dc2tog three times, Dc 36(42, 48, 54, 60, 66, 72, 78, 84), Dc2tog three times. Turn. [42(48, 54, 60, 66, 72, 78, 84, 90) Dc]
Row 29- Row 30: Repeat rows 2-3. [42(48, 54, 60, 66, 72, 78, 84, 90) Tr]
Row 31: Ch 2. Dc2tog three times, Dc 30(36, 42, 48, 54, 60, 66, 72, 78), Dc2tog three times. Turn. [36(42, 48, 54, 60, 66, 72, 78, 84) Dc]
Row 32- Row 33: Repeat rows 2-3. [36(42, 48, 54, 60, 66, 72, 78, 84) Tr]
Row 34: Ch 2. Dc2tog two times, Dc 28(34, 40, 46, 52, 58, 64, 70, 76), Dc2tog two times. Turn. [32(38, 44, 50, 56, 62, 68, 74, 80) Dc]
Row 35- Row 36: Repeat rows 2-3. [32(38, 44, 50, 56, 62, 68, 74, 80) Tr]
Sizes XS and Small finish off
Row 37: Ch 2. Dc2tog two times, Dc x(x, 36, 42, 48, 54, 60, 66, 72), Dc2tog two times. Turn. [x(x, 40, 46, 52, 58, 64, 70, 76) Dc]
Row 38- Row 39: Repeat rows 2-3. [x(x, 40, 46, 52, 58, 64, 70, 76) Tr]
Sizes M, L, & XL finish off
Row 40: Ch 2. Dc2tog two times, Dc x(x, x, x, x, 50, 56, 62, 68), Dc2tog two times. Turn. [x(x, x, x, x, 54, 60, 66, 72) Dc]
Sizes 2XL, 3XL, 4XL & 5XL finish off
Front Panel (make 2)
Row 1: Fdc 26(30, 34, 36, 40, 42, 46, 48, 52). Turn. [26(30, 34, 36, 40, 42, 46, 48, 52) Dc]
*If you are uncomfortable with the Fdc, you can Ch 28(32, 36, 38, 42, 44, 48, 50, 54), Dc in the 3rd Ch from the hook and in each Ch across. Turn.*
Row 2: Ch 3. Tr in the first St (where your Ch 3 is). *Skip the next St, Tr in the next St. Then, working behind the Tr you just made, Tr in the skipped St (one X created).* Repeat from * to * across until you have 1 St remaining. Tr in the last St. Turn. [26(30, 34, 36, 40, 42, 46, 48, 52) Tr]
Row 3: Ch 3. Tr in the first St (where your Ch 3 is). *Skip the next St, Tr in the next St. Then, working behind the Tr you just made, Tr in the skipped St (one X created).* Repeat from * to * across until you have 1 St remaining. Tr in the last St. Turn. [26(30, 34, 36, 40, 42, 46, 48, 52) Tr]
Row 4: Ch 2. Dc in each St across. Turn. [26(30, 34, 36, 40, 42, 46, 48, 52) Dc]
Repeat rows 2-4 until you have a total of 24 rows, ending on an X row.
Row 25: Ch 2. Dc2tog three times, Dc 14(18, 22, 24, 28, 30, 34, 36, 40), Dc2tog three times. Turn. [20(24, 28, 30, 34, 36, 40, 42, 46) Dc]
Row 26- Row 27: Repeat rows 2-3. [20(24, 28, 30, 34, 36, 40, 42, 46) Tr]
Row 28: Ch 2. Dc2tog three times, Dc 8(12, 16, 18, 22, 24, 28, 30, 34), Dc2tog three times. Turn. [14(18, 22, 24, 28, 30, 34, 36, 40) Dc]
Row 29- Row 30: Repeat rows 2-3. [14(18, 22, 24, 28, 30, 34, 36, 40) Tr]
Row 31: Ch 2. Dc2tog three times, Dc 2(6, 10, 12, 16, 18, 22, 24, 28), Dc2tog three times. Turn. [8(12, 16, 18, 22, 24, 28, 30, 34) Dc]
Row 32- Row 33: Repeat rows 2-3. [8(12, 16, 18, 22, 24, 28, 30, 34) Tr]
Row 34: Ch 2. Dc2tog 1(2, 3, 3, 3, 3, 3, 3, 3) times, Dc 4(4, 4, 6, 10, 12, 16, 18, 22), Dc2tog 1(2, 3, 3, 3, 3, 3, 3, 3) times. Turn. [6(8, 10, 12, 16, 18, 22, 24, 28) Dc]
Row 35- Row 36: Repeat rows 2-3. [6(8, 10, 12, 16, 18, 22, 24, 28) Tr]
Sizes XS and S finish off
Row 37: Ch 2. Dc2tog x(x, 2, 2, 3, 3, 3, 3, 3) times, Dc x(x, 2, 4, 4, 6, 10, 12, 16), Dc2tog x(x, 2, 2, 3, 3, 3, 3, 3) times. Turn. [x(x, 6, 8, 10, 12, 16, 18, 22) Dc]
Row 38- Row 39: Repeat row 2-3. [x(x, 6, 8, 10, 12, 16, 18, 22) Tr]
Sizes M, L & XL finish off
Row 40: Ch 2. Dc2tog x(x, x, x, x, 2, 3, 3, 4) times, Dc x(x, x, x, x, 4, 4, 6, 6), Dc2tog x(x, x, x, x, 2, 3, 3, 4) times. Turn. [x(x, x, x, x, 8, 10, 12, 14) Dc]
Sizes 2XL, 3XL, 4XL, & 5XL finish off
Construction
Place the back panel down first, then lay the two front panels on top of the back panel. Line up the sides and the top of the panels as shown. You can place stitch markers in the first decrease row (row 25) to mark where the armholes start. Sew along the tops of the vest first, then sew along the sides up to the stitch markers. I used a mattress stitch to sew mine together, you may use any method you are comfortable with.
To add Fringe
Adding fringe can be done in many different ways, depending on your personal preferences. I will explain how I added my fringe.
Cut pieces of yarn approximately 15 inches long. When these pieces are folded in half, it will make the fringe approximately 7 inches. If you would like your fringe pieces longer or shorter, simply adjust the length of the yarn pieces you cut. Then, starting at a corner, insert your hook into the bottom chain stitch from your first row. Pull the yarn through, then tie in a knot to secure. Skip the next stitch and repeat this process for every other stitch around. I used 3 pieces of yarn for each fringe “section” but again this is personal preference. You may want to have thicker or thinner fringe “sections”, simply adjust how many pieces of yarn you pull through each chain.
Tie off, tuck in those ends and enjoy your new Quinn Cardi Vest!
Make sure to pin this pattern for later, and if you do make one tag me @Cactus.and.lace on Instagram and use the hashtag #CactusandlaceDesigns . I can’t wait to see your Quinn Cardi Vest, and I would love to share your pics! 🌵
Other Free Crochet Patterns You Might Love


The Kahe Kai Top // The Harlow Halter Top // The Lovelace Tee // The Ari Cardigan